Droplet
Introduction
The Devprime Platform accelerates software developer productivity by offering a complete software architecture design, components with intelligent behaviors, accelerators for code deployment, and updates with new features.
During this article, we’ll use a microservice with an order-related business rule, a database in MongoDB. We’ll demonstrate the steps to build the microservice, hosting services on DigitalOcean, and then the configurations needed to make it available using the free plan.
Checklist and preparation of the initial local environment:
- Open an account on the Devprime platform and purchase a [(Developer/Enterprise)] license(https://devprime.io/pricing).
- Install an updated version of .NET (Linux, macOS, and Windows).
- Install and/or update Visual Studio Code and/or Visual Studio 2023 Community / Professional / Enterprise.
- Install and/or update docker (For Windows, use WSL2).
- Initialize the MongoDB and RabbitMQ containers using docker and add the ‘orderevents’ queue using RabbitMQ.
- Install and activate the latest version of the Devprime CLI.
- Create a folder for your projects and set read and write permissions.
- See the article “Creating the First Microservice” to explore getting started with the Devprime platform.
- Open a Cloud account at DigitalOcean
(Your $200 Credit, You’ve been invited to DigitalOcean! Sign up and get a $200, 60-day credit to try our products. Spend $25 after your credit expires and whoever referred you will get $25 in credit!)
Creating a microservice to use in the example
The first step is to create a new microservice to use as a template for publishing to the cloud. The name of this microservice will be set to “ms-order”, and we will use the MongoDB database and the RabbitMQ stream, as demonstrated in the command below.
- Create a folder named
\doand enter it. - Run the Devprime CLI to create the first microservice:
dp new ms-order --stream rabbitmq --state MongoDB
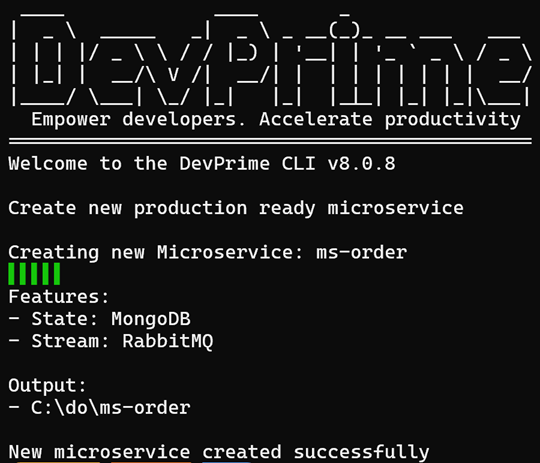
- Add an example business rule “Order” with the behavior of one Aggregate Root class and another entity class. Go to the
\do\ms-orderfolder and type:
dp marketplace order - Enable the Devprime CLI accelerator to build implementations of the microservice, such as repository, application service, API exposure, and communication between application layers:
dp init
Once the new microservice is created, enter the “ms-order” project folder and you can now view all implementations through Visual Studio Code as demonstrated in the article related to creating the first microservice.
To open in Visual Studio Code:
code .
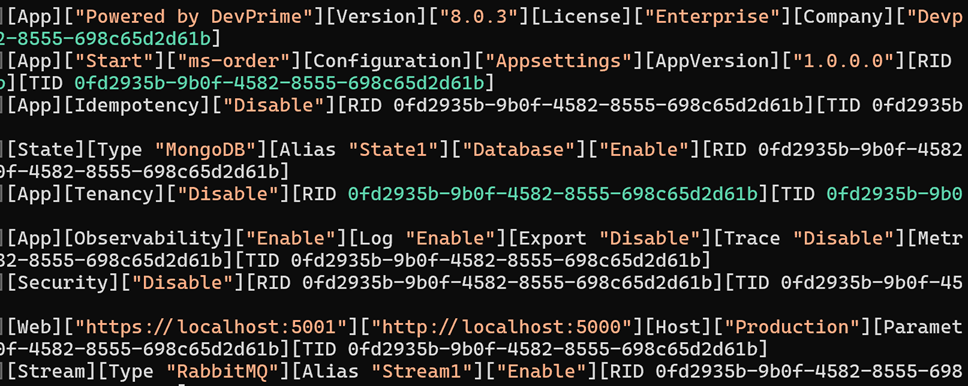
At this time we will not use RabbitMQ and will disable it in the Stream Adapter settings via the configuration file at src\App\appsettings.json.
- Enter the new folder
ms-orderand open it through Visual Studio Code
code src\App\appsettings.json - Locate the “DevPrime_Stream” key and in the “Enable” option put “false”.
- Change the “OrderCreated” Handler by commenting out the line “Dp.Stream.Send(destination, eventName, eventData);” so that there is no event sent by the Stream.
Open the Handler from Visual Studio Code
src\Core\Application\EventHandlers\Order\OrderCreatedEventHandler.cs
Running the new Order microservice
The previous steps enable a production-ready microservice with the business rules obtained by Devprime’s marketplace.
chmod permission on Linux, macOS
To run the “.sh” file on (Linux, macOS) it is necessary to add the permission below making the script executable.
chmod +x run.sh
Start the microservice by running one of the scripts below:
.\run.ps1 (Windows) ou ./run.sh (Linux, macOS)
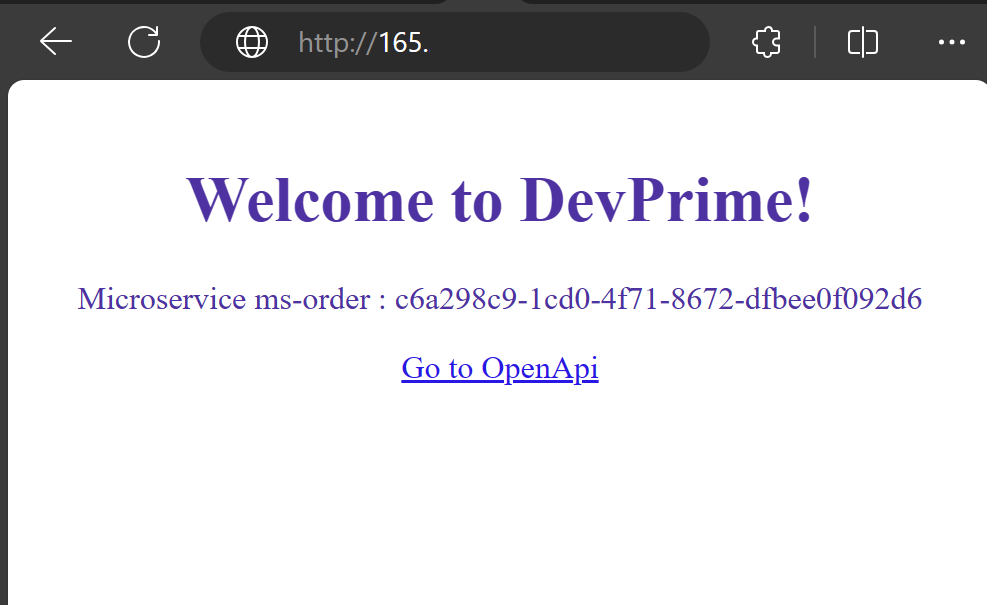
The microservice can run locally in Linux, macOS, and Windows environments as shown in the example below:
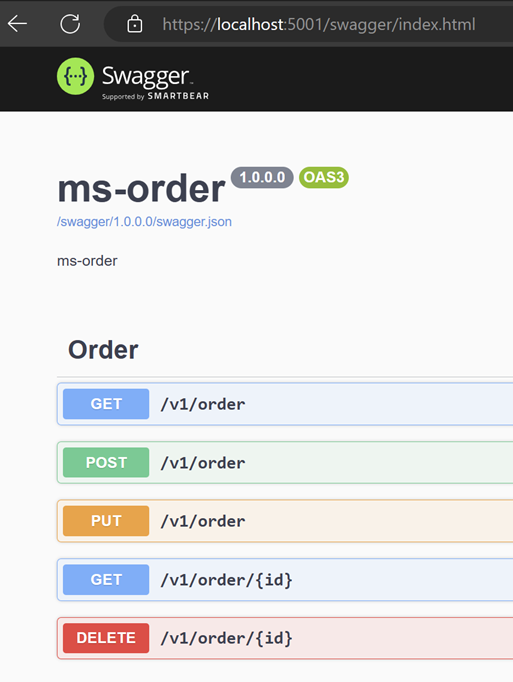
By accessing the ms-order microservice API, we already have an “OpenAPI” implemented.
Accessing the microservice configuration file
In the local environment, you can edit, if necessary, application settings and credentials in the src/App/appsettings.json file, such as the MongoDB and RabbitMQ access data used in the project.
To open in Visual Studio Code:
code src/App/appsettings.json
Creating a new Droplet and MongoDB on DigitalOcean
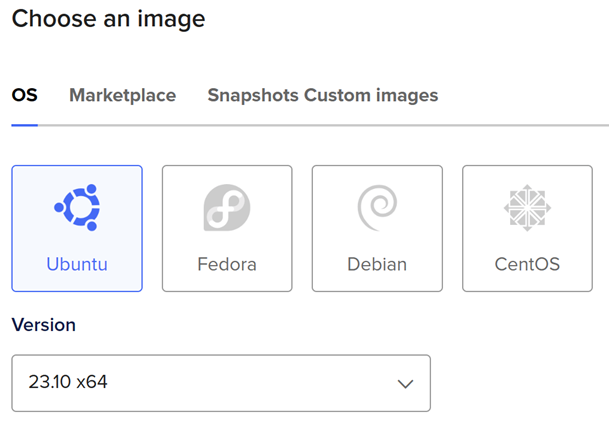
The next step is to create a new Droplet using the “Ubuntu 23.10 x64” image as a base, choosing the basic configuration of 1 CPU and 512 MB of RAM. An interesting feature of this DigitalOcean virtual machine is the speed of provisioning, which is already available in seconds.
During creation, remember to enable the “Add improved metrics monitoring and alerting (free)” option to enable a better visualization of the metrics.
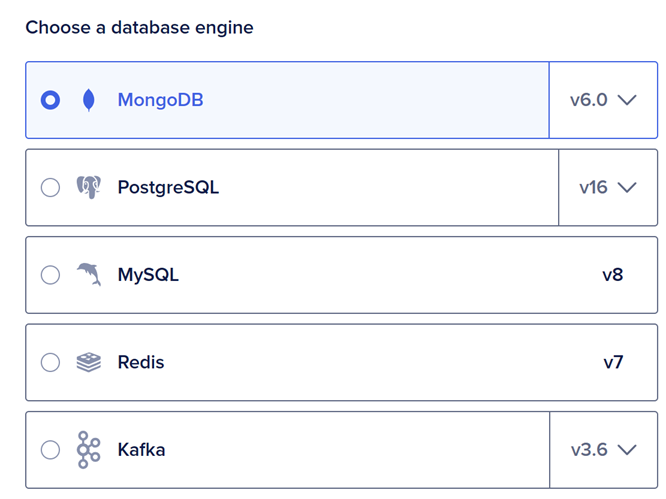
You have the option to deploy services directly to your Droplet, however, since DigitalOcean offers some other managed features and for the purposes of this demo, we will create a MongoDB instance.
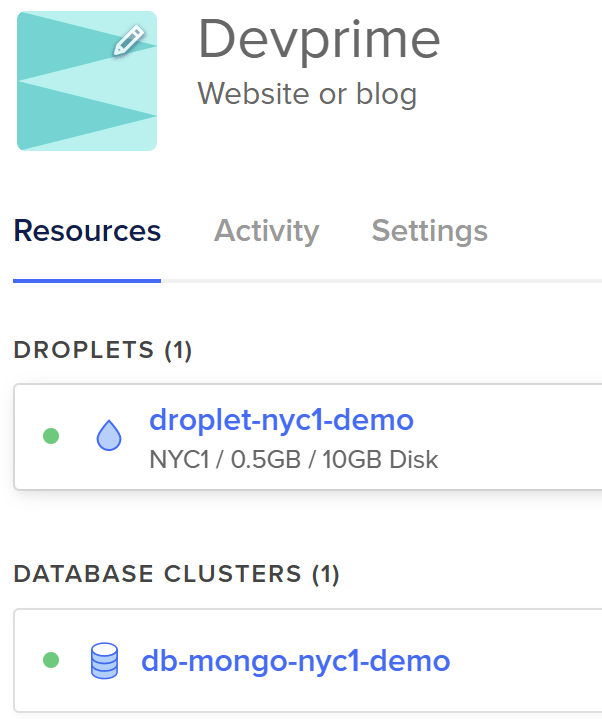
Below you can see the summary of the dashboard on DigitalOcean with the three services created (Droplet, MongoDB) and available for use.
The next step is for you to get the MongoDB credentials and connection strings “db-mongodb-nyc1-demo” to add to your configuration file in the microservice.
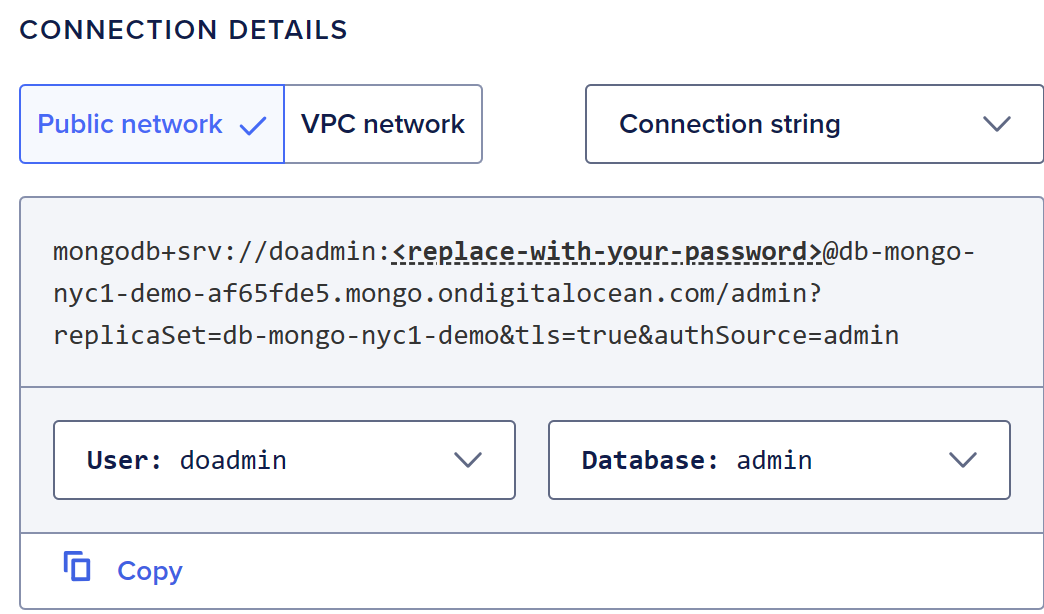
Then locate the DevPrime_State item and in connection add the connection data from the db-mongo-nyc1-demo database.
Open Settings
code src\App\appsettings.json
|
|
At this point, you can re-run the application and make a post using the API. If the credentials are correct, you are already accessing the database.
Installing .NET Runtime or SDK in the Droplet at DigitalOcean
An application based on the .NET platform can run on Linux, macOS, and Windows. We have the option to install only the Runtime or choose the SDK when you want to perform a build within the virtual machine environment itself (DROPLET).
In this article, we’re adopting the Runtime option. To do this, simply access the DigitalOcean portal, in the terminal, and/or use an SSH or Putty tool on Windows.
|
|
Install .NET SDK or .NET Runtime on Ubuntu
Exporting microservices and publishing to DigitalOcean
We’ll build the microservice locally and then ship it using any FTP client. We connected to FTP using the SFTP protocol on port 22, using the “root” user and the password informed in the creation of the Droplet.
Before publishing, we’ll change the default port used in the configuration file. To do this, locate the “DevPrime_Web” item and, in URL, keep only the value "url": "http://*:80".
Open Settings:
code src\App\appsettings.json
Now, enter the root folder of the project and run the publish command to have .NET export a publishable version using the .NET Runtime in the output folder in the -o parameter.
Run the command:
dotnet publish .\src\App\App.csproj -c Release -o output
Log in to the droplet from the terminal using SSH and create a folder at the root:
/devprime
Use FTP to send the contents of the local folder ms-order/output to the destination folder /devprime.
In the terminal, run the application inside the /devprime:
dotnet App.dll
Accessing the microservice over the public internet
By using a Droplet, the deployment leaves all ports open. Since we set the URL “http://*:80” with port 80 on the Web adapter, you can now access it directly from the Droplet IP. To use SSL, you need to configure a domain for the Droplet IP and use an Nginx with Let’s Encrypt, for example, to generate a certificate.
Go to your Droplet and get the public IP to access over HTTP only, for example, http://127.0.0.1, where 127.0.0.1 will be your Droplet IP. At the end of the test, stop your application to continue to the next step.
Configuring Microservice as a Service on Linux
An important feature when working with your application within an environment such as Droplet/Virtual Machine is to configure the application as a service to ensure that it continues to run even if the environment is restarted.
- Open nano to add the devprime service code:
sudo nano /etc/systemd/system/devprime.service
Add the content below and start saving.
|
|
-
Restart the daemon:
sudo systemctl daemon-reload -
Enable the new devprime service:
sudo systemctl enable devprime -
Starting the service. At this point, you can access the web again:
sudo systemctl start devprime -
Checking the status:
sudo systemctl status devprime -
Optional to restart the service when necessary:
sudo systemctl restart devprime -
Keeping track of microservice logs:
sudo journalctl -f -u devprime -
Optional, if it does not present logs in item 7:
sudo systemctl restart systemd-journald
At this point, you can run a cURL internally and confirm that the service is running. You can even restart the Droplet and retest internal and external connectivity by validating that the service started on its own.
curl -X GET http://127.0.0.1:80
Adding an SSL Certificate Using Nginx
To use HTTPS, you need to have a domain configured and pointing to the IP of your Droplet. This domain can be configured within DigitalOcean under MANAGE > Networking > Domains or externally. In this guide, we’ll use a subdomain called “do.devprime.io.”
It is important to remember that Nginx will run on ports 80/443. Because of this, we will change our microservice to port 5000, as access to it will be done by Nginx internally and no longer directly exposed.
-
Open your project settings and change the URL item to
"url": "http://*:5000". You can do this in the original project as per the previous steps and republish via FTP or edit theappsettings.jsonwithin the Droplet.
nano appsettings.json -
Restart the microservice.
sudo systemctl restart devprime -
Installing Nginx on Droplet.
sudo apt update && sudo apt install nginx -
Checking the status.
sudo systemctl status nginx -
Making Nginx a Service.
sudo systemctl enable nginx -
Installing Certbot and the Nginx plugin.
sudo apt update && sudo apt install certbot
sudo apt install python3-certbot-nginx -
Creating Let’s Encrypt SSL certificate. Do not perform before validating your DNS propagation to the droplet IP. Remember to modify the domain name in the items below.
sudo certbot certonly --nginx -d do.devprime.io --email your-email@your-domain.com -
Use your domain on Nginx.
sudo nano /etc/nginx/sites-available/do.devprime.io1 2 3 4 5 6 7 8 9 10 11 12 13 14 15 16 17 18 19 20 21 22 23 24 25 26 27 28 29 30server { listen 80; server_name do.devprime.io; location / { proxy_pass http://localhost:5000; # Porta interna da sua aplicação proxy_http_version 1.1; proxy_set_header Upgrade $http_upgrade; proxy_set_header Connection keep-alive; proxy_set_header Host $host; proxy_cache_bypass $http_upgrade; } } server { listen 443 ssl; server_name do.devprime.io; ssl_certificate /etc/letsencrypt/live/do.devprime.io/fullchain.pem; ssl_certificate_key /etc/letsencrypt/live/do.devprime.io/privkey.pem; location / { proxy_pass http://localhost:5000; # Porta interna da sua aplicação proxy_http_version 1.1; proxy_set_header Upgrade $http_upgrade; proxy_set_header Connection keep-alive; proxy_set_header Host $host; proxy_cache_bypass $http_upgrade; } } -
Create a symbolic link.
sudo ln -s /etc/nginx/sites-available/do.devprime.io /etc/nginx/sites-enabled/ -
Validate the Nginx configuration.
sudo nginx -t -
Reboot Nginx.
sudo systemctl restart nginx -
Access the public url of the site again but using https or use the command
below to check the connection details by remembering to change the URL. The log return demonstrates the use of Let’s Encrypt SSL.
curl -v https://do.devprime.io
* processing: https://do.devprime.tech
* Connected to do.devprime.io (x.x.x.x) port 443
* SSL connection using TLSv1.3 / TLS_AES_256_GCM_SHA384
* ALPN: server accepted http/1.1
* Server certificate:
* subject: CN=do.devprime.tech
* start date: Apr 10 15:28:12 2024 GMT
* expire date: Jul 9 15:28:11 2024 GMT
* subjectAltName: host "do.devprime.io" matched cert's "do.devprime.io"
* issuer: C=US; O=Let's Encrypt; CN=R3
* SSL certificate verify ok.
* using HTTP/1.1
> GET / HTTP/1.1
> Host: do.devprime.io
> User-Agent: curl/8.2.1
< HTTP/1.1 200 OK
< Server: nginx/1.24.0 (Ubuntu)
< Connection: keep-alive
<div style='text-align:center;padding:10px;margin:10px;color:#512da8'>
<h1>Welcome to DevPrime! </h1>
<p>Microservice ms-order : 57f36e89-2b14-490f-81b2-a46a814830bf</p>
<p><a href='/swagger/index.html'>Go to OpenApi</a></p>
-
Edit crontab and enable automatic renewal of Let’s Encrypt SSL certificate.
crontab -e10 0 * * * /usr/bin/certbot renew --quiet -
Listing the crontab assets.
1 2crontab -l sudo ls /etc/cron.d/ -
Activating the firewall.
In this example, you can enable the firewall using The Uncomplicated Firewall (UFW) available on Linux, releasing ports 80/443/22 by following the steps listed.1 2 3 4 5 6 7 8 9 10 11# Habilitar ufw allow http ufw allow https ufw allow ssh ufw enable # Status ufw status verbose # Desligar ufw disable
Final Thoughts
During this article, you learned how to deploy a microservice developed using Devprime platform technology on a DigitalOcean Linux Droplet. We demonstrate a basic walkthrough that basically consists of installing the .NET runtime and copying the compiled project. The other configurations are additional Linux features for a better experience running your application.
In a production environment, it is highly recommended to use a vault for credentials and a robust DevOps strategy to orchestrate the entire publish automatically.
To learn more:
Last modified November 20, 2024 (61099f59)