Asynchronous communication between microservices
Devprime-based applications natively incorporate an ‘Event-Driven architecture’ approach by receiving external events, processing business rules by emitting internal events and if necessary propagating the events externally using the Stream adapter that natively connects with RabbitMQ, Kafka and other platforms.
At this point, we’ll set up a demo involving two microservices. The first is “Order” to receive orders and the second is “Payment” to process the payment. In the example, we’ll use two containers built in docker. It’s critical to upload the MongoDB and RabbitMQ containers and configure to add the queue “orderevents and paymentevents” in Rabbitmq. Before proceeding, follow the initial steps by installing the Devprime CLI.
If you already have MongoDB/RabbitMQ services, change the settings in the /src/App/app/appsettings.json file in State and Stream with your credentials.
Creating the first “Order” microservice
We will use the Devprime CLI for creating the microservices. In this example, we’ll enter the name of the new application, the Stream service type as “RabbitMQ” for emitting asynchronous events, and the State as “MongoDB” for data persistence. To start a new microservice, use the command example shown and a new application will be created in seconds and ready for production.
dp new Order --stream rabbitmq --state mongodb
Adding a Marketplace Business Rule to Accelerate Development
dp marketplace order
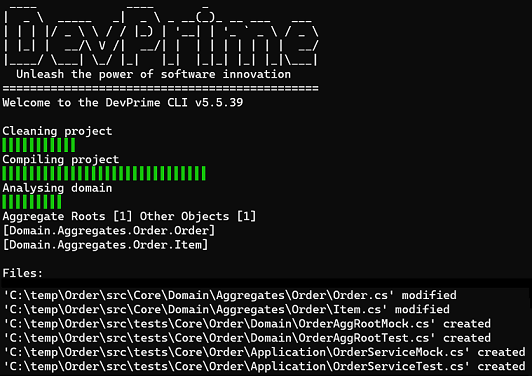
Running accelerator for implementation of code based on the Domain. When you run the command the first time in this demo, type “A” so that you can go ahead and make the changes.
dp init
The accelerator automatically implements the classes of “Domain Events” in Domain, Event Handlers in Application, “Domain Services” in Application, “Application Services” in Application, persistence in State, “API’s” in Web and some unit tests in Tests as an example.
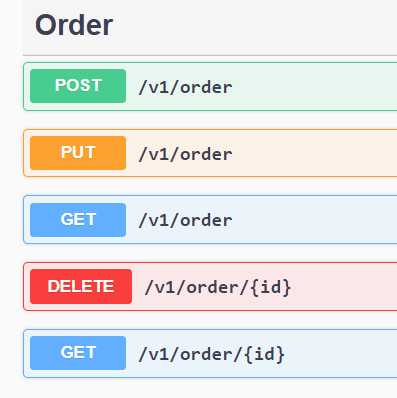
When you run the application again using the script “.\run.ps1” (Windows) or “.\run.sh” (Linux/macOS) we will already have a new view of your API. Open the web browser at url http://localhost:5000 and locate the post method in Swagger and click on “Try it out”.
Fill in the JSON data and then click “execute”. Return to the command prompt and track the result in the microservice log automatically generated by the Devprime Observability adapter.
To see an example of code implemented by the accelerator, follow the OrderCreatedEventHandler.cs code in the src/Core/Application/EventHandlers/Order folder, which provides a Handle where it persists the state of an aggregate ‘order’ and then notifies via the Stream adapter.
|
|
At this point, the log demonstrates the receipt of an HTTP request in the “Order” API, which is passed on to the application service, and then the business rule in the domain that processes and emits the “OrderCreated” event, which, in addition to having the state persisted in mongo, resulted in a notification in the external world by Stream.
By now entering RabbitMQ through its portal, it is possible to observe this event in the “OrderEvents” queue. This means that this microservice has already fulfilled its role and notified this business fact so that it can be perceived by another service.
Because the communication in this example is fully asynchronous, if there are events in the RabbitMQ queue, they will be read by the “Payment” microservice as soon as we set it up. You can stop the application by pressing the “Control” + “C” key at any time and load again whenever you want.
Congratulations !! You already have the “Order” microservice
Creating the second microservice “Payment”
The second microservices will be called “Payment” and we’ll start building it at that point. An additional item that we will do during the implementation is precisely to activate the “subscribe” in the Stream adapter so that we can receive the events emitted by the “Order” microservice.
Running the new dp and creating the microservices
dp new ms-payment --state mongodb --stream rabbitmq
Adding a Marketplace Business Rule to Accelerate Development
dp marketplace payment
Running Accelerator for Domain-Based Code Implementation
dp init
Since we’ll be running two microservices in the same on-premises environment, it’s necessary to change the http port of Payment. In the ms-payment project folder, edit the src/App/appsettings.json file in the web key and changing it to 5002 and 5003 as an example.
|
|
Run the application using the command below
.\run.ps1 ou ./run.sh (Linux, MacOS)
If the application has run everything is fine. Close it with “Control+C” and we’ll continue with the implamentations to enable the reception of the events emitted by the “Order” microservices.
The next step is to add the configuration to the Stream service and create a DTO to receive the event data. You can do the whole process manually or by using the accelerator below.
dp add subscribe OrderCreated -as PaymentService
When you confirm the change, you will have three modified files so that we can move forward with the settings.
|
|
Open the file Edit the OrderCreatedEventDTO.cs file and add the properties below.
code src\Core\Application\Services\Payment\Model\OrderCreatedEventDTO.cs
|
|
Now edit the “EventStream.cs” file by setting the properties set in the OrderCreatedEventDTO. We will modify the application service to use the “Add” service. This implementation indicates that we will be performing “Subscribe” on the event called “OrderCreated” that will be bound to the alias “Stream1” on the Stream adapter.
code src\Adapters\Stream\EventStream.cs
|
|
The final step is to change the Stream Adapter configuration file in the file (src/App/appsettings.json) and add the queue/topic name “OrderEvents” in “subscribe” as per example below.
|
|
Congratulations !! You already have the “Payment” microservices
Asynchronous communication between microservices
Now you’ve reached the big time to run both microservices. Open each one in a window and run for those who have the services active. Go to the “Order” microservices url in http://localhost:5000 and then go to Post and click on the “Try it out” button. Make a post and follow the incredible result with the complete detail in each microservices and Payment reacting to the event received.
Right now we are checking the result of the processing in the “Order” microservices that receive
a post and emits the “OrderCreated” event. All details are automatically generated by the Devprime Observability adapter.
[INF][Web]["https://localhost:5001;http://localhost:5000"][Host]["Production"][Parameters]["Appsettings"][RequestId: 3282e6f8-d2bd-4ccf-934a-546276a83038]
[2021-06-19T20:23:07.654-03:00][INF][Web]["HTTP"][Order][Add]["{\n  \"customerName\": \"Ramon\",\n  \"customerTaxID\": \"string\",\n  \"itens\": [\n    {\n      \"description\": \"string\",\n      \"amount\": 0,\n      \"sku\": \"string\",\n      \"price\": 0\n    }\n  ],\n  \"total\": 0\n}"][Origin:"https://localhost:5001/swagger/index.html"][RequestId: 06721dfc-fd50-4783-8ea7-df201c22599b]
[INF][Application][OrderService][Add][RequestId: 06721dfc-fd50-4783-8ea7-df201c22599b]
[INF][Domain][Order][Add][RequestId: 06721dfc-fd50-4783-8ea7-df201c22599b]
[INF][Domain][Order][Handle][Event]["OrderCreated"][RequestId: 06721dfc-fd50-4783-8ea7-df201c22599b]
[INF][Application][EventHandler]["OrderCreatedEventHandler"][Event]["OrderCreated"][RequestId: 06721dfc-fd50-4783-8ea7-df201c22599b]
[INF][State][Type "MongoDB"][Alias "State1"][OrderRepository][Add][RequestId: 06721dfc-fd50-4783-8ea7-df201c22599b]
[INF][Stream][Type "RabbitMQ"][Alias "Stream1"][Out][Event]["OrderCreated"]["Delivered"]["OrderEvents"]["{\"SagaId\":\"00000000-0000-0000-0000-000000000000\",\"Id\":\"35bc8937-deb8-4e35-a8c4-003171fd6e1b\",\"CorrelationId\":\"06721dfc-fd50-4783-8ea7-df201c22599b\",\"AppId\":\"3282e6f8-d2bd-4ccf-934a-546276a83038\",\"AppName\":\"ms-order\",\"Version\":1,\"Name\":\"OrderCreated\",\"When\":\"2021-06-19T20:23:07.8540357-03:00\",\"Payload\":{\"CustomerName\":\"Ramon\",\"CustomerTaxID\":\"string\",\"Total\":0,\"ID\":\"55a72f16-f4e5-476b-85d9-e86c6e6f390c\"}}"][RequestId: 06721dfc-fd50-4783-8ea7-df201c22599b]
And now the moment comes the ‘OrderCreated’ event in the “Payment” microservices.
[INF][Web]["https://localhost:5003;http://localhost:5002"][Host]["Production"][Parameters]["Appsettings"][RequestId: 072b12e7-c941-4b4b-9823-cbd6e4425309]
[INF][Stream][Type "RabbitMQ"][Alias "Stream1"][In][Event]["OrderCreated"]["OrderEvents"]["{\"SagaId\":\"00000000-0000-0000-0000-000000000000\",\"Id\":\"35bc8937-deb8-4e35-a8c4-003171fd6e1b\",\"CorrelationId\":\"06721dfc-fd50-4783-8ea7-df201c22599b\",\"AppId\":\"3282e6f8-d2bd-4ccf-934a-546276a83038\",\"AppName\":\"ms-order\",\"Version\":1,\"Name\":\"OrderCreated\",\"When\":\"2021-06-19T20:23:07.8540357-03:00\",\"Payload\":{\"CustomerName\":\"Ramon\",\"CustomerTaxID\":\"string\",\"Total\":0,\"ID\":\"55a72f16-f4e5-476b-85d9-e86c6e6f390c\"}}"][RequestId: 35bc8937-deb8-4e35-a8c4-003171fd6e1b]
[INF][Application][PaymentService][Add][RequestId: 35bc8937-deb8-4e35-a8c4-003171fd6e1b]
[INF][Domain][Payment][Add][RequestId: 35bc8937-deb8-4e35-a8c4-003171fd6e1b]
[INF][Domain][Payment][Handle][Event]["PaymentCreated"][RequestId: 35bc8937-deb8-4e35-a8c4-003171fd6e1b]
[INF][Application][EventHandler]["PaymentCreatedEventHandler"][Event]["PaymentCreated"][RequestId: 35bc8937-deb8-4e35-a8c4-003171fd6e1b]
[INF][State][Type "MongoDB"][Alias "State1"][PaymentRepository][Add][RequestId: 35bc8937-deb8-4e35-a8c4-003171fd6e1b]
Last modified April 11, 2024 (cc33f7e6)Congratulations🚀 You’ve just developed two microservices. To use Kafka, simply change the settings of the Stream adapter.


