SendGrid
Important
The following example uses SendGrid, but you can use the library you want, the focus at this point is on understanding how Devprime enables the use of extensions and how to integrate them into your project without hurting the established architectural principles, ensuring separation of responsibilities and decoupling.
Creating a microservice to use in the example
We will use a microservice based on the Devprime platform
- Use an active account on Devprime and activate the Devprime CLI.
- Start the containers from docker (MongoDB and RabbitMQ)
- Create the orderevents queue in RabbitMQ.
Type the command below in a directory of your choice, and then open the project in Visual Studio, VSCODE, or your preferred IDE:
dp new order --state mongodb --stream rabbitmq --marketplace orderGo to the root folder of the project: .\order\
Domain Implementations
We’re going to include a field of Email in our aggregate root domain layer. Open the existing class Order.cs in the path code .\src\core\domain\aggregates\order\Order.cs, include the property as highlighted below (line 6), and save the changes:
|
|
Accelerating Deployments with the CLI
The next step will be to use the CLI to speed up most of the necessary implementations and for that type the command below in your terminal:
dp initThe CLI requests authorization to change the necessary files of the solution, in this case we will type A to authorize all the files.
Starting SendGrid Setup
Change the “Devprime_Custom” key setting as shown in the example below:
code .\src\app\appsettings.json
|
|
Adding an extension
We’re now going to include the “MailService” class that will be our extension, via the following Devprime CLI command.
|
|
The CLI requests another authorization to change the required files of the solution, press A to authorize all the files.
The following image shows the MailService class and its IMailService Interface, whose responsibility will be to implement the integrations with the SendGrid API.
It also shows the Extensions class and the IExtensions interface whose purpose is to be a proxy that allows the Devprime Pipeline execution context to access all extensions available in the application via dependency injection.
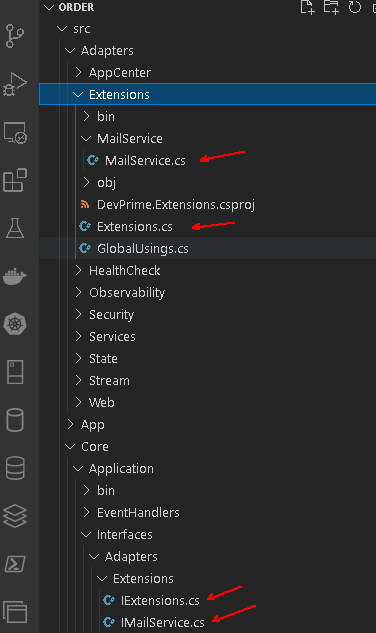
When running the command to include the extension, notice that the CLI also generated its injection in the “Extensions” class: code .\src\adapters\extensions\Extensions.cs
|
|
Adding the Reference to the SendGrid Library
We’re going to include the SendGrid library in our project, remember to set the installation target for the “Devprime.Extensions” project. code .\src\adapters\extensions\Devprime.Extensions.csproj
Via dotnet CLI
dotnet add .\src\adapters\extensions\Devprime.Extensions.csproj package SendGridAlso run dotnet build in the project. (Remember to be in the root folder of the project .\order\):
dotnet buildImplementing the SendGrid integration
We’re going to change the “IMailService” interface code .\src\core\application\interfaces\adapters\extensions\IMailService.cs, including the following method signature:
|
|
We also need to implement the method in the “MailService” class
code .\src\adapters\extensions\mailservice\MailService.cs, as per the following model:
|
|
Let’s better understand some existing features in the code above:
| Code | Description |
|---|---|
| Dp.Settings.Default("…") | Get key in the app AppSettings.json |
| Dp.Observability.Log("…") | Prints personalized log |
Implemented the extension adapter call
Our scenario involves a domain event called “OrderCreated” and associated with it we have an EventHandler called “OrderCreatedEventHandler”, which has a call to the Devprime State Adapter for data persistence (line 11) and emits an event external to the application (line 23).
Path: code .\src\core\application\eventhandlers\order\OrderCreatedEventHandler.cs
|
|
Let’s change the code of our EventHandler according to the model below (see highlighted lines):
|
|
Testing the app
Now that we have the necessary implementations, let’s run the microservice via the command below:
Windows
.\run.ps1Linux/Mac
.\run.shIn the browser, go to the link: https://localhost:5001/swagger, we will use the POST method to create a new order:
 `
`
Use the Request Body below:
|
|
You should receive the email as configured in the application.