Asynchronous communication between microservices with Azure Event Hubs
Devprime-based applications natively incorporate an event-driven architecture approach. They receive external events, process business rules, emit internal events, and, when necessary, propagate the events externally using the Stream adapter, which connects natively to Kafka, Kafka, and other platforms.
Now, we’ll put together a demo involving two microservices. The first, “Order”, will receive orders, while the second, “Payment”, will process payments. In the example, we’ll use two containers built on docker. It is essential to upload MongoDB and Kafka containers.
If you already have the MongoDB and Kafka services locally, change the settings in the /src/App/app/appsettings.json file in the State and Stream sections with your credentials.
Checklist and preperation of the initial environment:
- Open an account on the Devprime platform and purchase a [(Developer/Enterprise)] license(https://devprime.io/pricing).
- Explore: the article “Creating the first microservice” to understand the first steps in Devprime.
- Install an updated version of .NET (Linux, macOS, and Windows)
- Install and activate the latest version of the Devprime CLI.
- Install and/or update Visual Studio Code and/or Visual Studio 2023 Community / Professional / Enterprise.
- Install and/or update or update docker (For Windows, use WSL2).
- Create a service in Azure Event Hubs
- Initialize the MongoDB and Kafka containers on docker and add the ‘orderevents’ and ‘paymentevents’ queue in Kafka and Azure Event Hubs.
- Create a folder for your projects and set read and write permissions.
- Devprime supports Kafka Stream by following the settings.
Sample source code with the Order and Payment microservices
This article will implement the sample code below for all Devprime platform subscribers. You don’t need to download it and you can follow the implementation in the next topics. Use it as a deployment reference and skip this step.
|
|
Important:
- If you have downloaded the project, you need to run the command
dp stackin the cloned folder to update your Devprime license in the projects.
|
|
- Change the settings in Order and Payment to Kafka support.
Creating and getting the configurations in the default Azure Event Hubs “Kafka”
Creating the service in Azure Event Hubs can be done directly from the portal, CLI, or API. Next, we’ll add the “orderevents” and “paymentevents” topics, and get the hostname and connection string with the credentials required to access the new Event Hubs service created in Microsoft Azure.
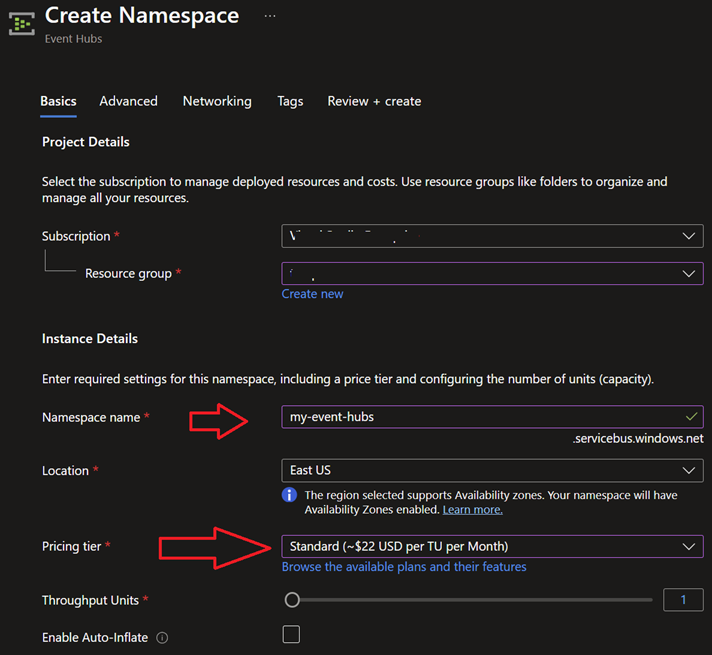
Sign in to the Azure portal and create a new Azure Event Hubs named “my-event-hubs”. In this image, our service will be created with the hostname “my-event-hubs.servicebus.windows.net”. It is necessary to choose the “Standard or higher tier to follow this example”.
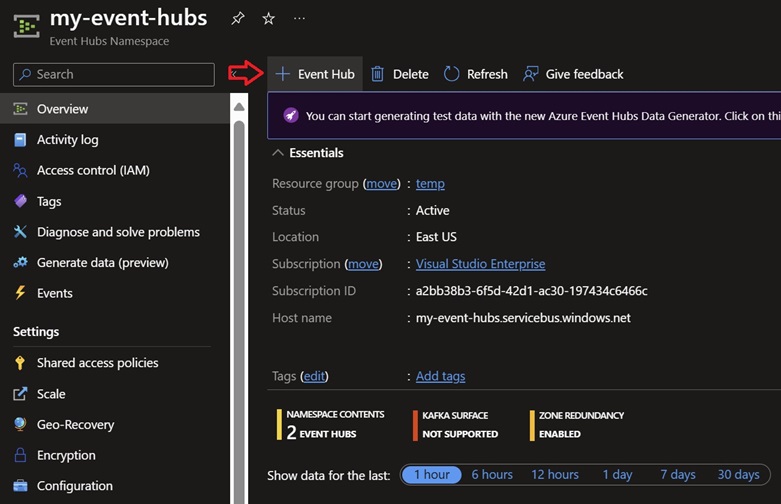
Now locate the “Create Event Hubs” option in the portal and add the “orderevents” and then “paymentevents” topics.
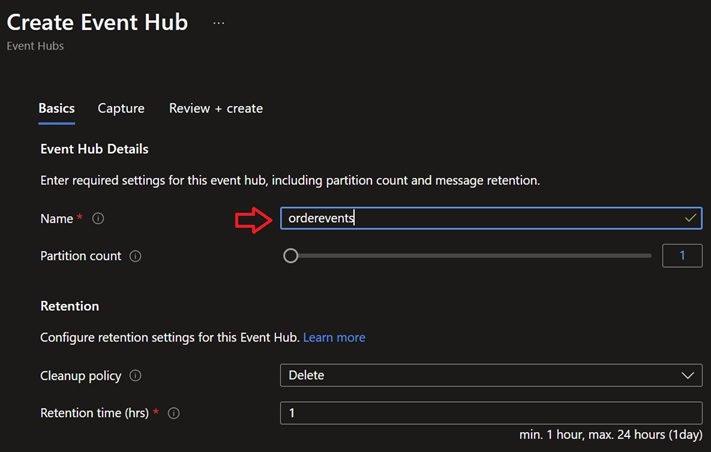
Check out the example of creating the “orderevents” topic. Enter the lowercase texts and replicate in the “paymentevents”.
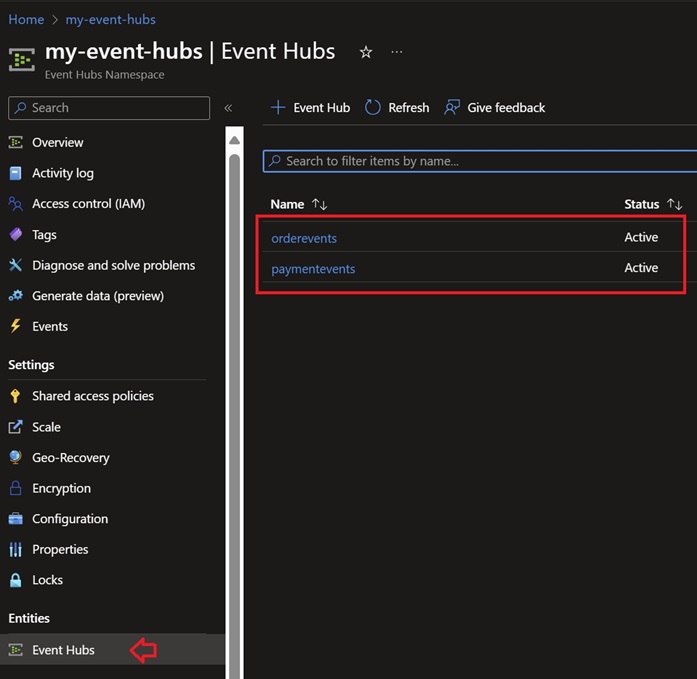
After following the steps, it will be possible to view the topics created in the portal.
Now that you have the topics created, access the “Shared access policies” menu and get only the value of the “Connection string–primary key” field to use as the access credential to Azure Event Hubs.

At the end we will have the following data to apply in the stream settings of each microservice (Order/Payment).
| Item | Value |
|---|---|
| User | $ConnectionString |
| Password | Endpoint=sb://my-event-hubs.servicebus.windows.net/; SharedAccessKeyName=RootManageSharedAccessKey; SharedAccessKey=40DOcvh8xHawS+UxGMvntO17EmqcMd3p2+AEhKuXty8= |
| HostName | my-event-hubs.servicebus.windows.net |
| Port | 9093 |
It is important to remember that the value of the “User” and “Port” is fixed as presented, the “Password” is the connection–primary key string, the “HostName” was obtained as per the name of the Azure Event Hub, and the Port is fixed 9093.
Creating the first “Order” microservice
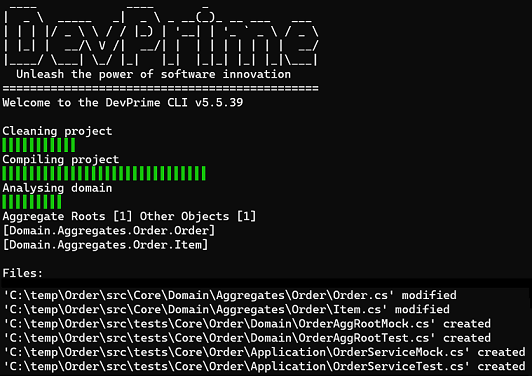
We will use the DevPrime CLI for creating the microservices. In this example, we’ll enter the name of the new application, the Stream service type as “Kafka” for asynchronous event emitting, and the State as “MongoDB” for data persistence. To start a new microservice, use the sample command that appears. A new application will be created in seconds and will be ready for production.
dp new Order --stream kafka --state mongodb
Adding an order business rule using Devprime Marketplace. In a normal scenario you will implement using Domain-Driven Design.
dp marketplace order
Running accelerator for implementing code based on the Domain. When you run the command, type “A” so that you can move forward and make the changes.
dp init
The accelerator will automatically deploy the classes of “Domain Events” in Domain, “Event Handlers” in Application, “Domain Services” in Application, “Application Services” in Application, persistence in State, APIs in Web and some unit tests in Tests as an example to incorporate your unit testing strategy.
Note: You can use any Kafka Client tool to connect with the above parameters.
Applying the Access Credential in the Stream of the “Order” microservice
Now it’s time to apply the Azure Event Hubs service access settings in the Devprime Platform Stream Adapter via the Kafka driver, enabling with the configuration template below. In this scenario, we are working in the developer’s local environment and will make the changes to the file appsettings.json, as shown in the example below in the project folder.
Open Visual Studio Code from “Orders”
code src\App\appsettings.json
|
|
Running the “Order” microservice
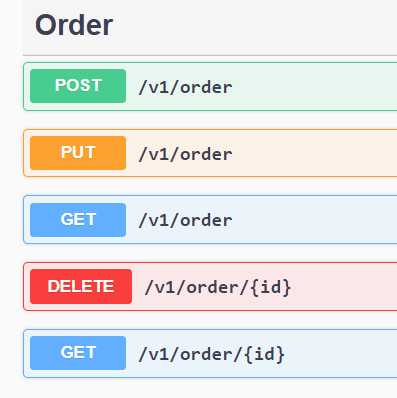
When you run the application again using the “.\run.ps1” (Windows) or “.\run.sh” (Linux/macOS) script we will already have a new view of your API. Open the web browser at the url http://localhost:5000 and locate the post method in Swagger and click “Try it out”.
Fill in the JSON data and then click “execute”. Return to the command prompt and track the result in the microservice log automatically generated by the Devprime Observability adapter.
To check out an example of code implemented by the accelerator, follow the code of the Handler OrderCreatedEventHandler.cs which notifies via the Stream adapter a new request created.
Open via Visual Studio Code in “Order”
code src/Core/Application/EventHandlers/Order/CreateOrderEventHandler.cs
|
|
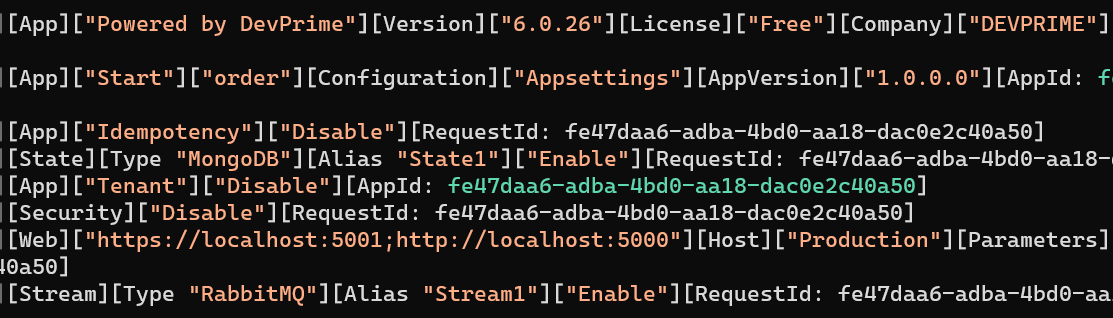
At this point, the log demonstrates the receipt of an HTTP request in the “Order” API, which passes it on to the application service. Then, the business rule in the domain is processed, emitting the “OrderCreated” event. This event has its state persisted in MongoDB and results in a notification in the external world by the Stream.
When accessing Kafka through the portal, you can observe this event in the “OrderEvents” queue. This means that the “Order” microservice has already fulfilled its role and notified this business fact so that it can be noticed by another service.
Since the communication in this example is fully asynchronous, the events in the Kafka queue will be read by the “Payment” microservice as configured. You can stop the application by pressing “Control” + “C” at any time and load it again when you want.
Congratulations !! You already have the “Order” microservice
Creating the second microservice “Payment”
The second microservice will be called “Payment”, and we’ll start building it at this point. During implementation, an additional item that we will configure will be the activation of “subscribe” on the Stream adapter, allowing the “Payment” microservice to receive the events emitted by the “Order” microservice.
Running dp new and building microservices
dp new ms-payment --state mongodb --stream kafka
Adding a Payment Business Rule via Devprime Marketplace
dp marketplace payment
Running Devprime’s “dp init” command for implementing Domain-Driven Design (DDD)-based code.
dp init
To run both microservices in the same on-premises environment, you need to change the HTTP port of the “Payment” microservice. In the “ms-payment” project folder, edit the file src/App/appsettings.json, in the “web” key, changing it to 5002 and 5003, as shown in the example below:
Open Visual Studio Code from “Payment”
code src\App\appsettings.json
|
|
Applying the access credential in the “Payment” microservice Stream
Now it’s time to apply the Azure Event Hubs service access settings in the Devprime Platform Stream Adapter via the Kafka driver, enabling with the configuration template below. In this scenario, we are working in the developer’s local environment and will make the changes to the file appsettings.json, as shown in the example below in the project folder.
Open Visual Studio Code from “Payment”
`code src\App\appsettings.json
|
|
Executando o microsserviço “Payment”
Execute a aplicação utilizando o comando abaixo
.\run.ps1 ou ./run.sh (Linux, MacOS)
Se a aplicação rodou está correndo tudo bem. Feche a mesma com “Control+C” e seguimeremos com as implamentações para habilitar o recebimento dos eventos emitidos pelo microsserviços “Order”.
O próximo passo é adicionar a configuração no serviço de Stream e criação de um DTO para recebermos os dados do evento. Você pode fazer todo o processo manualmente ou utilizando o acelerador abaixo.
dp add subscribe OrderCreated -as PaymentService
Ao confirmar a alteração você terá três arquivos modificados para que possamos avançar nas configurações.
|
|
Abra o arquivo OrderCreatedEventDTO.cs e adicione as seguintes propriedades:
Abra pelo Visual Studio Code em “Payment”
code src/Core/Application/Services/Payment/Model/OrderCreatedEventDTO.cs
|
|
Agora, edite o arquivo “EventStream.cs” configurando as propriedades definidas no “OrderCreatedEventDTO”. Modificaremos o serviço de aplicação para utilizar o método “Add”. Essa implementação indica que estaremos realizando um “Subscribe” no evento chamado “OrderCreated”, que será vinculado ao alias “Stream1” no adaptador Stream.
Abra pelo Visual Studio Code em “Payment”
code src/Adapters/Stream/EventStream.cs
|
|
The final step is to change the Stream adapter configuration file in the appsettings.json file and add the queue/topic name “orderevents” under “Subscribe”, as per the example below:
Open Visual Studio Code from “Payment”
code src\App\appsettings.json
|
|
Congratulations! You already have the “Payment” microservice configured to subscribe to the queue/topic named “OrderEvents”.
Asynchronous communication between microservices
Now you’ve reached the big time to run both microservices. Open each one in a terminal tab/window and run for both services to be active. Go to the URL of the “Order” microservice in http://localhost:5000 and then go to “Post” and click on the “Try it out” button. Make a post and follow the incredible result, with the complete breakdown in each microservice and the “Payment” reacting to the event received and issuing the final event in “orderpayments”
Right now, we’re checking the processing result in the “Order” microservice, which receives a POST and emits the “OrderCreated” event. All details are automatically generated by the Devprime Observability adapter.
[INF][Web]["https://localhost:5001;http://localhost:5000"][Host]["Production"][Parameters]["Appsettings"][RequestId: 3282e6f8-d2bd-4ccf-934a-546276a83038]
[2021-06-19T20:23:07.654-03:00][INF][Web]["HTTP"][Order][Add]["{\n  \"customerName\": \"Ramon\",\n  \"customerTaxID\": \"string\",\n  \"itens\": [\n    {\n      \"description\": \"string\",\n      \"amount\": 0,\n      \"sku\": \"string\",\n      \"price\": 0\n    }\n  ],\n  \"total\": 0\n}"][Origin:"https://localhost:5001/swagger/index.html"][RequestId: 06721dfc-fd50-4783-8ea7-df201c22599b]
[INF][Application][OrderService][Add][RequestId: 06721dfc-fd50-4783-8ea7-df201c22599b]
[INF][Domain][Order][Add][RequestId: 06721dfc-fd50-4783-8ea7-df201c22599b]
[INF][Domain][Order][Handle][Event]["OrderCreated"][RequestId: 06721dfc-fd50-4783-8ea7-df201c22599b]
[INF][Application][EventHandler]["OrderCreatedEventHandler"][Event]["OrderCreated"][RequestId: 06721dfc-fd50-4783-8ea7-df201c22599b]
[INF][State][Type "MongoDB"][Alias "State1"][OrderRepository][Add][RequestId: 06721dfc-fd50-4783-8ea7-df201c22599b]
[INF][Stream][Type "Kafka"][Alias "Stream1"][Out][Event]["OrderCreated"]["Delivered"]["OrderEvents"]["{\"SagaId\":\"00000000-0000-0000-0000-000000000000\",\"Id\":\"35bc8937-deb8-4e35-a8c4-003171fd6e1b\",\"CorrelationId\":\"06721dfc-fd50-4783-8ea7-df201c22599b\",\"AppId\":\"3282e6f8-d2bd-4ccf-934a-546276a83038\",\"AppName\":\"ms-order\",\"Version\":1,\"Name\":\"OrderCreated\",\"When\":\"2021-06-19T20:23:07.8540357-03:00\",\"Payload\":{\"CustomerName\":\"Ramon\",\"CustomerTaxID\":\"string\",\"Total\":0,\"ID\":\"55a72f16-f4e5-476b-85d9-e86c6e6f390c\"}}"][RequestId: 06721dfc-fd50-4783-8ea7-df201c22599b]
And now the time comes for the ‘OrderCreated’ event in the “Payment” microservices.
[INF][Web]["https://localhost:5003;http://localhost:5002"][Host]["Production"][Parameters]["Appsettings"][RequestId: 072b12e7-c941-4b4b-9823-cbd6e4425309]
[INF][Stream][Type "Kafka"][Alias "Stream1"][In][Event]["OrderCreated"]["OrderEvents"]["{\"SagaId\":\"00000000-0000-0000-0000-000000000000\",\"Id\":\"35bc8937-deb8-4e35-a8c4-003171fd6e1b\",\"CorrelationId\":\"06721dfc-fd50-4783-8ea7-df201c22599b\",\"AppId\":\"3282e6f8-d2bd-4ccf-934a-546276a83038\",\"AppName\":\"ms-order\",\"Version\":1,\"Name\":\"OrderCreated\",\"When\":\"2021-06-19T20:23:07.8540357-03:00\",\"Payload\":{\"CustomerName\":\"Ramon\",\"CustomerTaxID\":\"string\",\"Total\":0,\"ID\":\"55a72f16-f4e5-476b-85d9-e86c6e6f390c\"}}"][RequestId: 35bc8937-deb8-4e35-a8c4-003171fd6e1b]
[INF][Application][PaymentService][Add][RequestId: 35bc8937-deb8-4e35-a8c4-003171fd6e1b]
[INF][Domain][Payment][Add][RequestId: 35bc8937-deb8-4e35-a8c4-003171fd6e1b]
[INF][Domain][Payment][Handle][Event]["PaymentCreated"][RequestId: 35bc8937-deb8-4e35-a8c4-003171fd6e1b]
[INF][Application][EventHandler]["PaymentCreatedEventHandler"][Event]["PaymentCreated"][RequestId: 35bc8937-deb8-4e35-a8c4-003171fd6e1b]
[INF][State][Type "MongoDB"][Alias "State1"][PaymentRepository][Add][RequestId: 35bc8937-deb8-4e35-a8c4-003171fd6e1b]
Congratulations! 🚀 You’ve just developed two microservices using Event-Driven with the Devprime platform and Kafka Stream.
To learn more:
Last modified November 20, 2024 (61099f59)