Devprime 9
This guide covers the essentials for upgrading from Devprime Platform version 8 to version 9 by leveraging the .NET 9 SDK. We’ve included detailed instructions on dockerfile changes, methods, settings, and more.
What’s New: Microsoft OpenAPI / Swagger / Scalar
.NET 9 introduced the Microsoft.AspNetCore.OpenApi library, which changes the traditional approach to documenting APIs. Now, it is possible to use tools such as Swagger and Scalar directly with this new library.
Available Tools
- Microsoft.AspNetCore.OpenApi
- Swashbuckle.AspNetCore.Swagger
- Scalar.AspNetCore
Updates to Methods in File App.cs
The table below highlights the changes in Devprime’s methods:
| Scope | Method | Description |
|---|---|---|
| Builder | AddOpenApi |
New Method to Add OpenApi |
| Builder | AddSwagger |
Renamed to AddDevPrimeSwagger |
| Builder | AddScalar |
New method to add Scalar |
| App | UseOpenApi |
New Method to Configure OpenApi |
| App | UseSwagger |
Renamed to UseDevPrimeSwagger |
| App | UseScalar |
New method to configure Scalar |
Updates in appsettings.json
Add or revise the keys below:
| Key | Description | Status |
|---|---|---|
EnableSwagger |
Enable Swagger Documentation | Existing |
EnableScalar |
Enable Scalar Documentation | New |
EnableOpenApi |
Enable OpenApi | New |
GetNotFound |
Enable customization for HTTP 404 | New |
Configuration Example:
|
|
Step by Step for Update
1. Environment Preparation
a. Install .NET SDK 9
Download .NET SDK
b. Update Devprime CLI
|
|
c. Authenticate in the CLI
|
|
2. Project Updates
a. Update Files .csproj
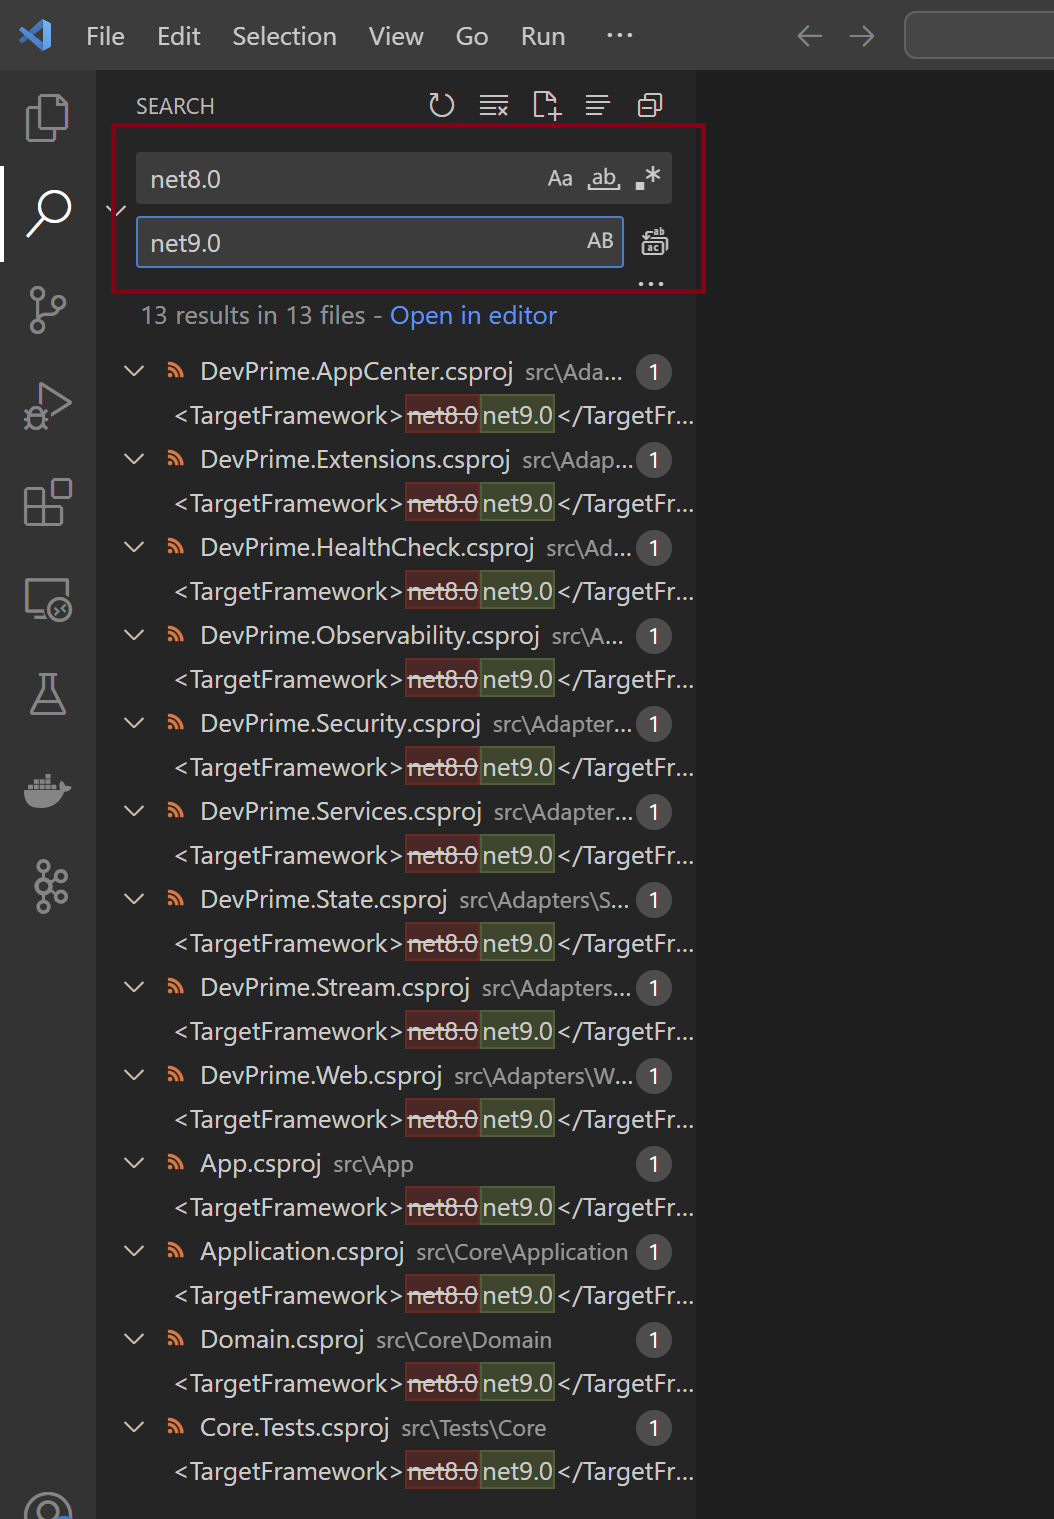
Modify TargetFramework to net9.0 using Visual Studio Code. Open the project folder in VS Code and in the Edit > Replace in Files menu, locate the items below and perform the replacement.
b. Upgrade Devprime’s Stack
Updated the Devprime components to version 9.0 in the .csproj file and the new License key in the appsettings.json file.
Run the command in your project folder:
|
|
c. Update the dockerfile
Update the references to .NET 9, change the dockerfile to use the docker image based on the .NET SDK 9. You need to locate the ASP.NET and then the SDK to perform the update.
- Open Visual Studio Code in your project folder
|
|
- Locate the aspnet reference and change it to the example:
|
|
- Locate the sdk reference and change to the example:
|
|
c. Update App.cs
With the introduction of the new methods (AddOpenApi, AddSwagger, AddScalar, and their Use* equivalents), configure the App.cs file to utilize the desired resources. Here are the detailed guidelines:
Open through Visual Studio Code in your project folder
|
|
Step 1: On the block builder
The example below shows the addition of the OpenAPI, Swagger, and Scalar services. You can use
the Swagger and Scalar together.
|
|
Step 2: On the block app
Configure the services in the app tile. The recommended order is UseOpenApi, followed by UseSwagger or UseScalar.
|
|
Step 3: Full file example App.cs
The App.cs can be configured to use OpenAPI, Swagger, and Scalar simultaneously as per
the example below from the microservice order.
|
|
Observations:
- Market trends: The use of Scalar is becoming popular and can replace Swagger in many cases. You can set up both initially and disable one of them as needed.
- Guaranteed compatibility: In case you don’t make any changes to the App.cs file, the default behavior will not be broken, but it is recommended to adopt the new methods to enjoy all the benefits.
d. Urls do OpenApi / Swagger / Scalar
Devprime will, by default, enable default URLs for the OpenApi, Swagger, and Scalar services, if enabled, as per the addresses below. These addresses will also vary depending on the local TCP port used in your microservice and the name of your project.
Example: For a project named order running on TCP port 5001:
| Service | URL |
|---|---|
| OpenApi | https://localhost:5001/openapi/order/1.0.0.0.json |
| Swagger | https://localhost:5001/swagger/index.html |
| Scalar | https://localhost:5001/scalar/order |
3. Web Interface Update (Optional)
Edit the index.cshtml file to include links to Swagger, Scalar, and OpenAPI:
|
|
4. Updating yaml settings in Kubernetes (Optional)
It’s important to remember that during this roadmap we’ve included new configuration buzzwords and you can manually change and/or use the Devprime CLI exporter to export the updated configuration:
Important Checklist
a) New configuration parameters: (EnableSwagger, EnableScalar, EnableOpenApi, GetNotFound).
b) New License key that has been applied in your appsettings.json and needs to be updated in the production yaml.
For a complete example, run the command in the project folder:
|
|
Conclusion
By following this guide, your application will be ready to use what’s new in Devprime 9 and .NET 9. For questions, please contact technical support.