Kubernetes (DOKS)
Introduction
The Devprime platform accelerates software developer productivity by offering a complete software architecture design, components with intelligent behaviors, accelerators for code deployment, and updates with new features.
In this article, we will address the use of DigitalOcean’s Kubernetes service (DOKS), a cloud platform that offers several resources for software developers to use in applications.
We will use two microservices with one business rule related to orders and the other to payments using the MongoDB database managed by DigitalOcean. We will demonstrate the steps to create the microservice, cloud services on DigitalOcean such as Kubernetes (DOKS), Container Registry, MongoDB and deploy RabbitMQ on Kubernetes, then the initial configurations required.
Checklist and preparation of the initial environment
- Open an account on the Devprime platform and purchase a [(Developer/Enterprise)] license(https://devprime.io/pricing).
- Install an updated version of .NET (Linux, macOS, and Windows).
- Install and/or update Visual Studio Code and/or Visual Studio 2023 Community / Professional / Enterprise.
- Install and/or update docker (Linux, macOS and Windows) (For Windows, use WSL2).
- Initialize the [MongoDB and RabbitMQ containers on docker] locally(../../../quick-start/docker/) and add the ‘orderevents’ and ‘paymentevents’ queue in RabbitMQ.
- Install and activate the latest version of the Devprime CLI.
- Create a local folder for your projects and set read and write permissions.
- See the article “Creating the First Microservice” to explore getting started with the Devprime platform.
- Open a Cloud Account at DigitalOcean (Your $200 Credit, You’ve been invited to DigitalOcean! Sign up and get a $200, 60-day credit to try our products. Spend $25 after your credit expires and whoever referred you will get $25 in credit!).
Getting Started
In this article, we will use a project with two Microservices using asynchronous communication, with the first Order and the second Payment being that you can choose to create from scratch or using the example on GitHub.
a) Run a clone of the project on GitHub:
git clone https://github.com/devprime/devprime-microservices-order-payment.git
b) Access the cloned folder and check the home folder with the Order and Payment items. Each folder in this folder has a microservice developed with the Devprime platform and ready to use.
cd devprime-microservices-order-payment
git remote remove origin
c) Run the dp stack command to apply the update and your Devprime license:
dp stack
d) Run each microservice in a terminal tab to test locally using the .\run.ps1 files on Windows or run.sh on Linux and macOS. Apply the chmod permission on Linux, macOS.
chmod +x run.sh
Start the microservice by running one of the scripts below:
.\run.ps1 (Windows) or ./run.sh (Linux, macOS)
- /ms-order
- /ms-payment
With the microservices running, make a post to the order microservice API and track the processing in the payment microservice as described in the article on asynchronous communication between microservices.
Creating a Kubernetes (DOKS), Container Registry, and MongoDB Cluster at DigitalOcean
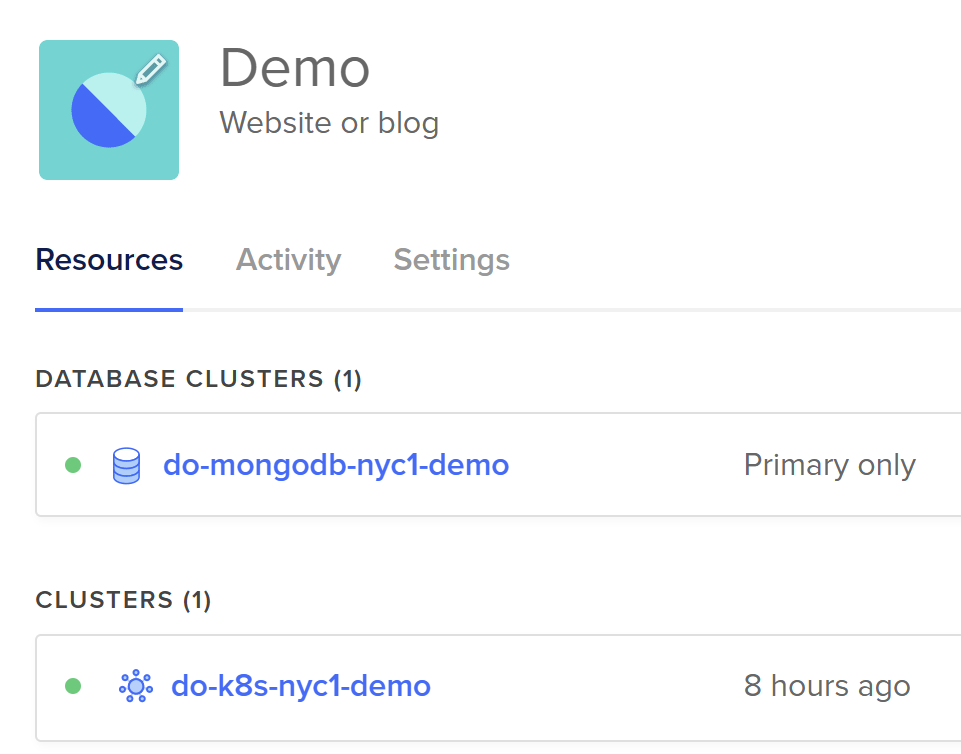
Access your portal at DigitalOcean and in the Kubernetes menu, enter the Create Cluster option to start the creation procedure and in node plan choose the appropriate size for your scenario, define the number of instances and proceed with the process. Perform the same procedure with Container Registry and in Database with MongoDB creating the initial services for use in this article.
In the image below is a view of the first services created, MongoDB and Kubernetes.
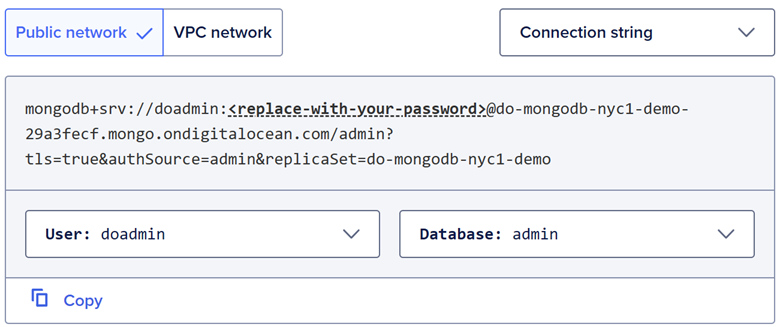
After creating the MongoDB cluster, it is essential to access the Connection String item and copy it to use in the configuration in the microservices (order/payment). Copy the entire connection string and make sure it is with the username and password.
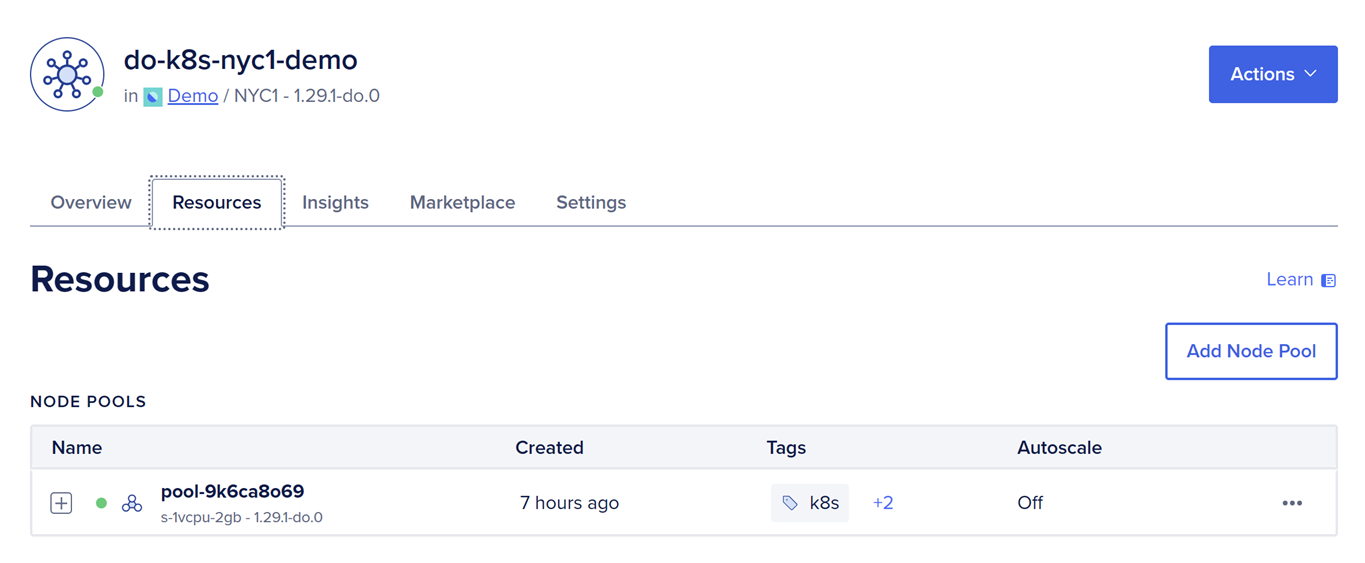
The Kubernetes cluster was named “do-k8s-nyc1-demo” for use in this article. In the marketplace item you have some cool features for deployment in the cluster using 1-Click Apps like NGINX Ingress Controller, Cert-Manager, OpenEBS NFS Provisioner, Kubernetes Monitoring Stack.
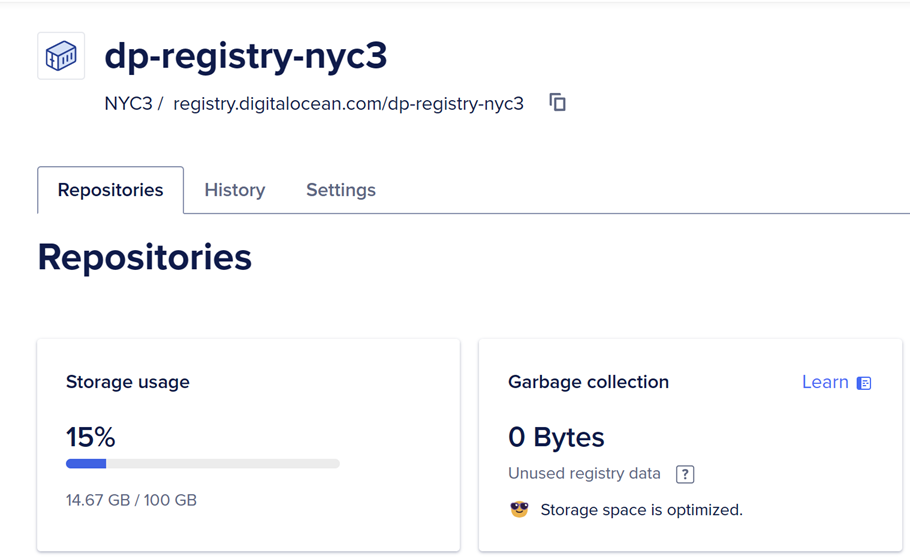
To publish containers to Kubernetes, we will use Container Registry which is named “dp-registry-nyc3”. Copy the url presented at this point, as we will use it later when creating the container image.
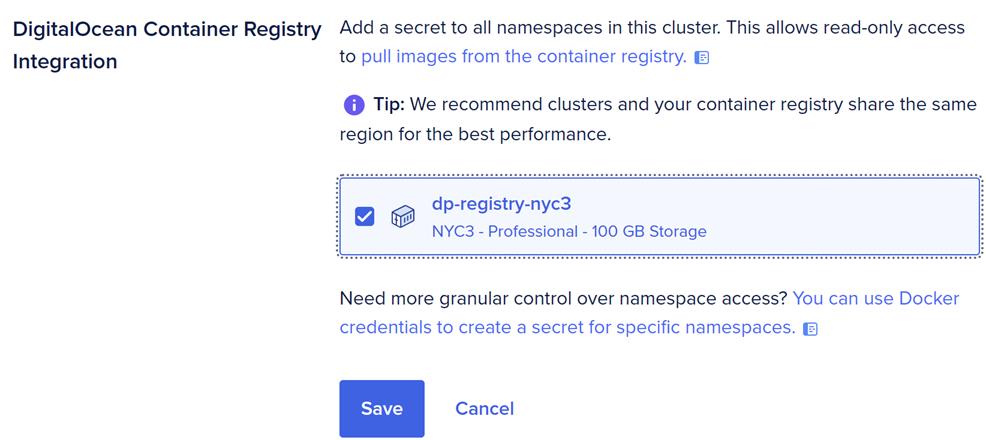
Now you need to follow an important step by linking your Kubernetes Cluster with the Container Registry to facilitate access to the containers within the cluster. In your Ckuster Kubernetes portal, go to Settings and then enter the “DigitalOcean Container Registry Integration” option and select Container Registry.
Installing tools for use on Kubernetes
We will use some tools for integration with Kubernetes such as kubectl, which is the Kubernetes CLI, Helm, tool to install packages on Kubernetes, K9S tool to view the cluster, Stern, tool to view logs on Kubernetes, doctl, DigitalOcean’s command-line tool, and docker.
After installing the doctl CLI, it is essential to follow the doctl configuration procedures to enable access to DigitalOcean and enable operations such as obtaining Container Registry and Kubernetes credentials.
Getting access to Kubernetes
Kubernetes Cluster access credentials can be obtained through the portal or by using the doctl CLI, as we will do during this article.
-
Obtaining the access credentials to the Cluster when confirming will be saved in the local environment “.kube/config”. Copy this command directly from the portal with your cluster’s Guid.
doctl kubernetes cluster kubeconfig save a61716c9-c207-4c23-b789-399a811ef050 -
Listing all pods in the Cluster
kubectl get pods --all-namespaces -
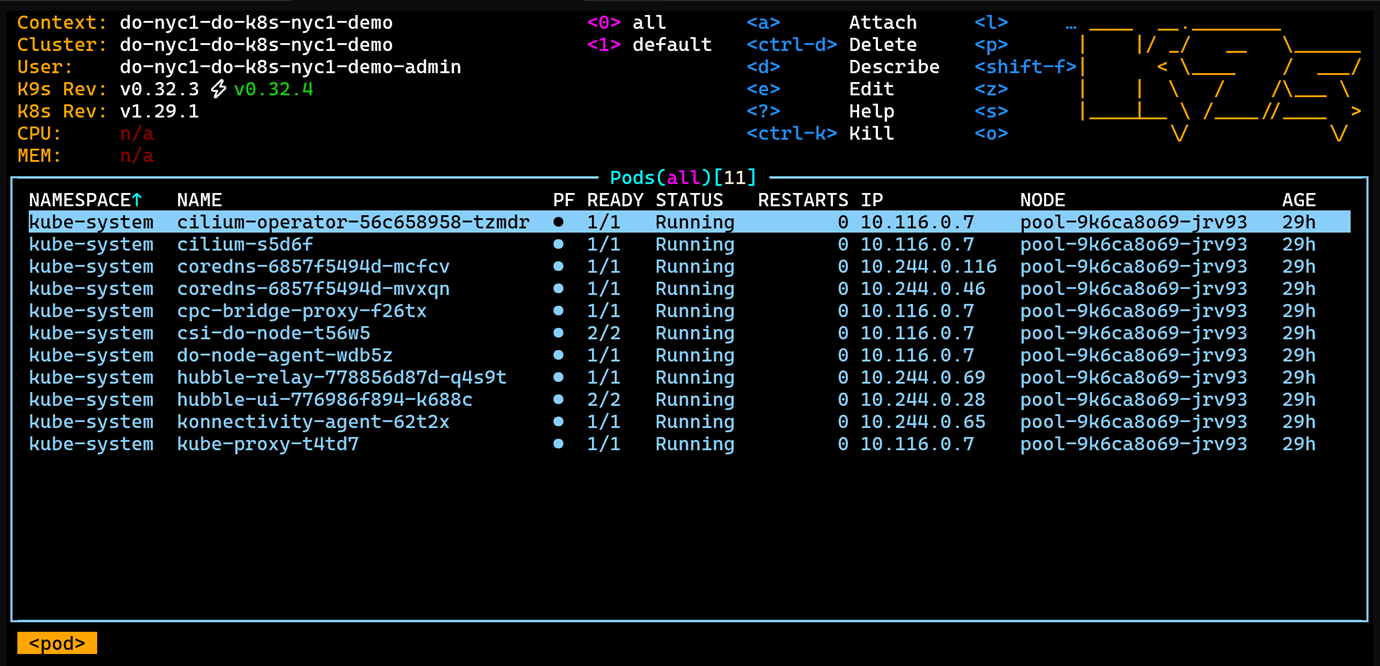
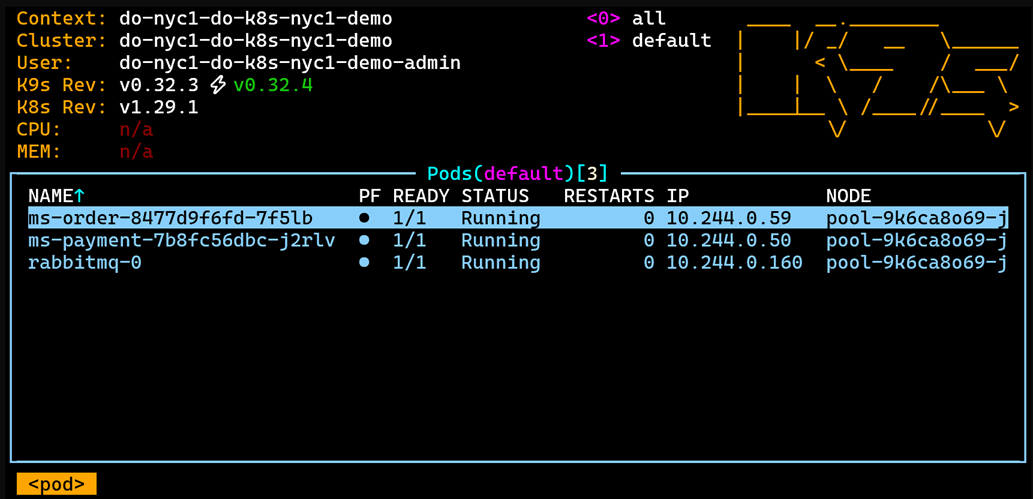
Using k9s to view the Cluster
k9s
In the image we are listing all the active containers deployed at the creation of the cluster. In the next steps we will start the creation of the order and payment container.
Creating docker images and publishing to Container Registry
An important step in the Kubernetes landscape is to build the docker image of our microservices so that we can perform the publishing within the Kubernetes Cluster environment.
Authenticating docker to Container Registry
doctl registry login
Building the order microservice image in docker
-
Enter the order microservice folder and run
cd ms-order
docker build -t ms-order . -
Create a tag for this image
docker tag ms-order registry.digitalocean.com/dp-registry-nyc3/ms-order:latest -
Pushing by pushing to docker
docker push registry.digitalocean.com/dp-registry-nyc3/ms-order:latest
Building the payment microservice image on docker
-
Go to the payment microservice folder and run
cd ms-payment
docker build -t ms-payment . -
Create a tag for this image
docker tag ms-payment registry.digitalocean.com/dp-registry-nyc3/ms-payment:latest -
Pushing by pushing to docker
docker push registry.digitalocean.com/dp-registry-nyc3/ms-payment:latest
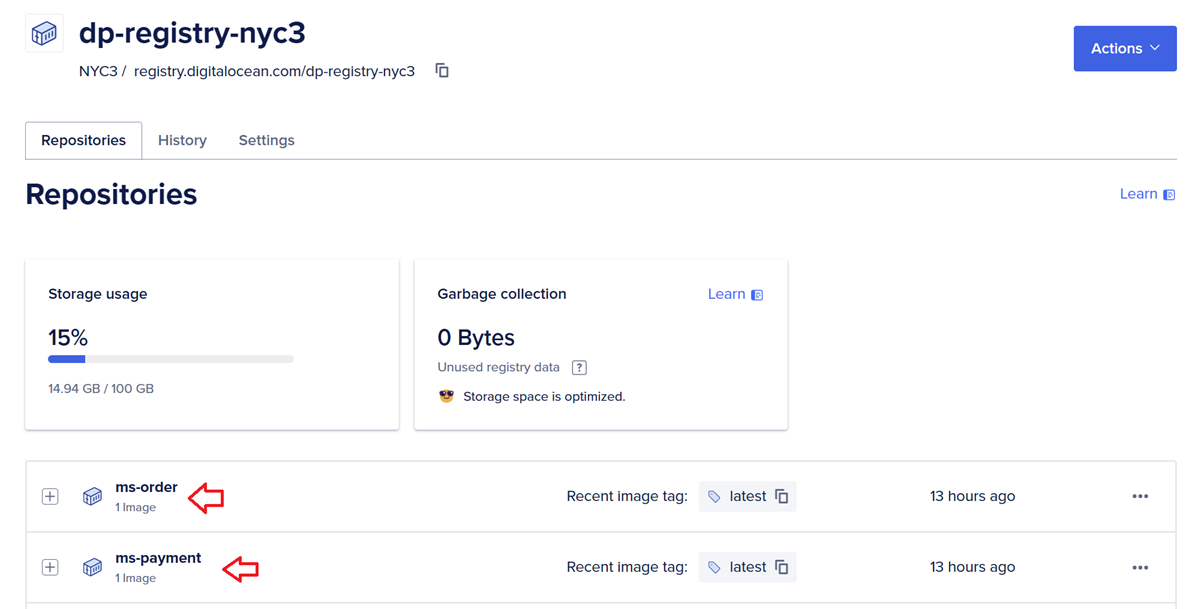
At the end of this push procedure, the order and payment images will be able to check in the Container Registry portal and they are ready for use in Kubernetes.
Deploying RabbitMQ on Kubernetes
The Devprime platform enables connectivity to various Stream services with RabbitMQ, Kafka and others and in this project we will use helm to deploy RabbitMQ in the cluster. Depending on the scenario in your project, you can choose to use the managed Kafka service offered by Digital Ocean or another alternative for communication between microservices.
Deploying RabbitMQ using Helm. Change the username and password at your discretion.
helm repo add bitnami https://charts.bitnami.com/bitnami
helm repo update
helm install rabbitmq bitnami/rabbitmq --set auth.username=admin --set auth.password=MQ@passX6DP
The RabbitMQ deployment process takes a while to complete and you can follow along from K9S. After installation, you can map the RabbitMQ ports in the local environment to access. Before mapping, it is essential to stop the local RabbiMQ container to avoid TCP port conflicts.
RabbitMQ Ports
- RabbitMQ AMQP port:
kubectl port-forward --namespace default svc/rabbitmq 5672:5672 - RabbitMQ Web Management interface:
kubectl port-forward --namespace default svc/rabbitmq 15672:15672
Configuring the Initial RabbitMQ Configuration
Map port 15672 and access the RabbitMQ administrative portal via url http://localhost:15672 to configure the ‘orderevents’ and ‘paymentevents’ queues in RabbitMQ and relate to the “exchange” as per the RabbitMQ documentation on Devprime in order to enable this article.
Parsing MongoDB and RabbitMQ credentials in microservices on-premises environments
In the local environment, you can edit the application settings and credentials in the src/App/appsettings.json file, such as the MongoDB and RabbitMQ access data used in the project and other items available in the Devprime configuration documentation.
To open the configuration for each microservice, enter the related folder
ms-order
ms-payment
Open from Visual Studio Code or another editor
code src/App/appsettings.json
View in the RabbitMQ and MongoDB keys the credentials used in the local environment and can be modified at any time.
|
|
|
|
Configuring MongoDB and RabbitMQ credentials in Kubernetes
In our context, we’ll create a deployment file for each microservice and use the DevPrime CLI to build the initial deployment.yml and service.yml files. To do this, we’ll run the command in each microservice’s folder. Next, we will perform the configuration with the credentials that we will use in the order and payment microservices within the Kubernetes cluster.
Enter the ms-order folder and run the command
dp export kubernetes
Enter the ms-payment folder and run the command
dp export kubernetes
The result will be similar to the snippet below, with two files created containing the initial configurations needed for publishing to Kubernetes. Notice that a deployment.yml file and a service.yml file were generated.
|
|
Now it’s time to edit the “deployment.yml” file and locate
the “image” item in the order folder and the payment folder.
Open the folder in Visual Studio Code or another editor
code .devprime
File: deployment.yml
|
|
Perform the procedure for each microservice (order / payment) and change the image item to the path of your image in the Container Registry. The url of the Container Registry is the same as the one used by the docker push command.
Run in ms-order folder
code .devprime/kubernetes/deployment.yml
|
|
Run in the ms-payment folder
code .devprime/kubernetes/deployment.yml
|
|
Now it’s time to configure the production credentials for RabbitMQ and RabbitMQ in each microservice.
MongoDB provided by DigitalOcean and handled at the beginning of the file where we talk about Connection String.
File:deployment.yaml
|
|
In item devprime_stream1 change the user to “admin” and the password to “MQ@passX6DP”.
in item devprime_state1 change the connection to the MongoDB Connection String in DigitalOean.
Below you can see an example after the changes that must be made to the microservices deployment files (order/payment). Make the change directly to each file to avoid modifying other parameters in this demo, as the keys have slight differences between microservices.
Run in ms-order folder
code .devprime/kubernetes/deployment.yml
|
|
Run in the ms-payment folder
code .devprime/kubernetes/deployment.yml
|
|
Deploying microservices on Kubernetes
Now the most awaited moment has arrived, where we will effectively publish the microservices (order and payment) within the Kubernetes cluster and for this we will use the deployment.yml and service.yml files of each microservice.
Enter each folder and run the commands below:
-
For the order microservice
- Navigate to the order service’s Kubernetes folder:
ms-order/.devprime/kubernetes - Apply deployment and service:
kubectl apply -f deployment.yml
kubectl apply -f service.yml
- Navigate to the order service’s Kubernetes folder:
-
For the ayment microservice
- Navigate to the payment service’s Kubernetes folder:
ms-payment/.devprime/kubernetes - Apply deployment and service:
kubectl apply -f deployment.yml
kubectl apply -f service.yml
- Navigate to the payment service’s Kubernetes folder:
Now that we’ve finished deploying the two microservices, we can view it directly in the cluster using the k9s tool or using kubectl.
Performing a test on the microservice
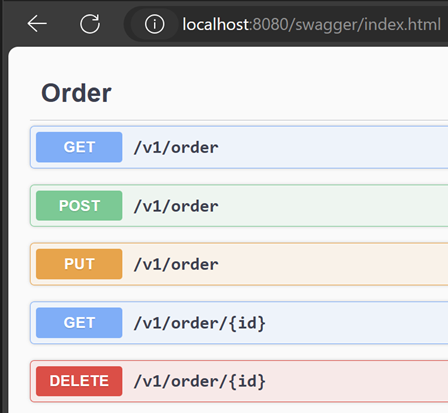
Open a terminal tab and run the port-forward command to map the order microservice to local port 8080 and allow you to perform the first test by accessing the platform directly on the cluster.
-
Run the command for the Order
kubectl port-forward --namespace default svc/ms-order 8080:80 -
Access the URL and POST to the order microservice to process and emit an event in the RabbitMQ queue and propagate to the payment microservice
http://localhost:8080
Assigning a public IP to the order microservice
Open the ms-order/.devprime/kubernetes/service.yml file with Visual Studio Code and change the “ClusterIP” to “LoadBalancer”:
|
|
Deleting the ms-order service:
kubectl delete svc ms-order
Recreating the ms-order service:
kubectl apply -f service.yml
Now query the update until you receive a public IP in the order microservice:
kubectl get svc ms-order -w
NAME       TYPE           CLUSTER-IP     EXTERNAL-IP     PORT(S)        AGE
ms-order   LoadBalancer   10.245.38.41   157.x.x.x   80:31256/TCP   2m32s
Viewing logs in Kuberbernetes
Microservices based on the Devprime platform provide an approach of automatic observability of distributed logs that can be viewed by kubectl, k9s, stern and indexed in tools such as SEQ, Elastic Search and many others to track the behavior of applications in the production environment.
In this example, we will use the stern tool to view the log of each deployment:
- Open a tab for the ‘order’ microservice in the terminal and run:
stern ms-order - Open a tab for the ‘payment’ microservice in the terminal and run:
stern ms-payment - Now, use port or public IP mapping and perform a post to the ‘order’ microservice to check a result. In the log below, you will see a summary of the ‘order’ as an example.
[INF][ms-order][Web]["http://*:80"][Host]["Production"][Parameters]["Environment"][RID 30c1c7a9-7799-43e6-a1b2-5d4007b3edb8][TID 30c1c7a9-7799-43e6-a1b2-5d4007b3edb8]
[INF][ms-order][Stream][Type "RabbitMQ"][Alias "Stream1"]["Enable"][RID 30c1c7a9-7799-43e6-a1b2-5d4007b3edb8][TID 30c1c7a9-7799-43e6-a1b2-5d4007b3edb8]
[INF][ms-order][Web]["HTTP"][Order][POST /v1/order][Origin "http://localhost/swagger/index.html"][RID c1461cc3-7000-473d-a62c-915867954ced][TID c1461cc3-7000-473d-a62c-915867954ced]
[INF][ms-order][Application][OrderService][Add][RID c1461cc3-7000-473d-a62c-915867954ced][TID c1461cc3-7000-473d-a62c-915867954ced]
[INF][ms-order][Domain][Order][Add][RID c1461cc3-7000-473d-a62c-915867954ced][TID c1461cc3-7000-473d-a62c-915867954ced]
[INF][ms-order][Domain][Order][ProcessEvent]["CreateOrder"][RID c1461cc3-7000-473d-a62c-915867954ced][TID c1461cc3-7000-473d-a62c-915867954ced]
[INF][ms-order][Application][EventHandler]["CreateOrderEventHandler"][Event]["CreateOrder"][RID c1461cc3-7000-473d-a62c-915867954ced][TID c1461cc3-7000-473d-a62c-915867954ced]
[INF][ms-order][State][Type "MongoDB"][Alias "State1"][Initialize][OrderRepository][Add][RID c1461cc3-7000-473d-a62c-915867954ced][TID c1461cc3-7000-473d-a62c-915867954ced]
[INF][ms-order][State][Type "MongoDB"][Alias "State1"][Complete][OrderRepository][Add][Duration 1192.1472ms][RID c1461cc3-7000-473d-a62c-915867954ced][TID c1461cc3-7000-473d-a62c-915867954ced]
[INF][ms-order][Domain][Order][ProcessEvent]["OrderCreated"][RID c1461cc3-7000-473d-a62c-915867954ced][TID c1461cc3-7000-473d-a62c-915867954ced]
[INF][ms-order][Application][EventHandler]["OrderCreatedEventHandler"][Event]["OrderCreated"][RID c1461cc3-7000-473d-a62c-915867954ced][TID c1461cc3-7000-473d-a62c-915867954ced]
[INF][ms-order][Stream][Type "RabbitMQ"][Alias "Stream1"][Out][Event]["OrderCreated"]["Delivered"]["orderevents"]
["{\""Payload\":{\"ID\":\"ca9983\",\"CustomerName\":\"Ramon Duraes\",\"CustomerTaxID\":\"AC875512\",\"Total\":1200}}"]
Final considerations
During this article, we demonstrated the publication of two microservices (order and payment) developed using Devprime platform technology on DigitalOcean’s Kubernetes cluster (DOKS), along with the managed Container Registry and MongoDB services and RabbitMQ that we deployed on the cluster using Helm. You also followed how to access the service using an internal IP and an External IP and view the logs.
In a production environment, it is essential to add an nginx ingress, an internet domain, and Let’s Encrypt to generate an SSL certificate, use a DevOps service to automate publishing, digital vault for credentials, access protection with an API Gateway, identity provider, and Web Application Firewall.
Find out more
Last modified February 27, 2025 (bf1c2a97)