OpenAI
Introduction
The Devprime Platform (https://devprime.io) accelerates software developer productivity by offering a complete software architecture design, components with intelligent behaviors, accelerators for code deployment, and updates with new features.
In this article, we will discuss the use of the Extensions Adapter present in the Devprime architecture, which allows you to add additional behaviors through external components based on the NuGet technology. This provides the possibility to expand the functionalities of the Devprime platform and adhere to software architecture standards, improving maintainability, reusability, and testability.
During this article we will use the nuget component Azure.AI.OpenAI which will enable access to the Microsoft Azure OpenAI and OpenAI APIs directly and you can test using the credentials of one of these services.
Checklist and preperation of the initial environment:
- Open an account on the Devprime platform and purchase a [(Developer/Enterprise)] license(https://devprime.io/pricing).
- Install an updated version of .NET (Linux, macOS, and Windows)
- Install and/or update Visual Studio Code and/or Visual Studio 2023 Community / Professional / Enterprise.
- Install and/or update docker (For Windows, use WSL2).
- Initialize the MongoDB and RabbitMQ containers on docker and add the ‘orderevents’ queue in RabbitMQ.
- Install and activate the latest version of the Devprime CLI.
- Create a folder for your projects and set read and write permissions.
- See the article “Creating the First Microservice” to explore getting started with Devprime.
- Create an account on Microsoft Azure OpenAI or hire the OpenAI API and obtain the access credentials.
Example ready with all the steps of the article
This article includes a complete project that demonstrates the feature discussed. You can choose to download it by following the steps below or simply proceed to the next items.
- Make a clone in the repo
git clone https://github.com/devprime/examples.git - Enter the folder
cd examples/extensions/openai/basic - Upgrade your Devprime license
dp stack - Update the MongoDB/RabbitMQ settings in the src/App/appsettings.json file
- Update the Azure OpenAI/OpenAI credentials in the src/App/appsettings.json file
- Locate in DevPrime_Custom the items:
ai.url/ai.credential/ai.deploymentmodel/
- Run the microservice
Creating a microservice to use in the example
The first step is to create a new microservice so that we can perform customizations in the Extensions Adapter, adding the external NuGet component and preparing it to interact with the OpenAI API. The name of this microservice will be set to “ms-ai” as demonstrated in the command below.
dp new ms-ai --state mongodb --stream rabbitmq
After creating the new microservice, enter the “ms-ai” project folder and you will be able to view all implementations through Visual Studio Code as demonstrated in the article related to creation of the first microservice.
Adding a Business Rule
The business rules in the Devprime platform architecture are based on Domain-Driven Design (DDD). /../../features/domain/), and to move forward, it is necessary to add a class Aggregate Root within the Domain project. To facilitate this procedure, we will use the command below available in the Devprime CLI.
dp add aggregate AI
Preview the new class created by Visual Studio Code.
code src/Core/Domain/Aggregates/AI/AI.cs
Modify the class AI by adding a property called “Prompt” as shown in the example below.
|
|
Using Devprime Platform Code Accelerators
Now that you’ve implemented a business rule, let’s use the Devprime CLI accelerator to generate the necessary code and start the microservice based on the initial business rule you provided.
Run the following command and type A to advance the deployments:
|
|
After completing this command, you will already have the basic implementations of your microservice and we will use it as a reference to move on to the next step, which involves embedding the OpenAI component in the Extension Adapter.
Adding Extension Intelligence
At this point, we will begin the procedures to enable a third-party extension provided as a NuGet component on the Devprime platform, following development standards that ensure maintainability and decoupling.
To speed up this process, we’ll use the command below, which implements the new extension in the App Service via an interface and dependency injection, and will build the required initial implementation into the adapter.
Run the command below:
dp add extensions IntelligenceService
|
|
The IntelligenceService class and its interface IIntelligenceService implement the integrations with the OpenAI library. On the other hand, the Extensions class and its IExtensions interface act as proxies, allowing the Devprime Pipeline execution context to access all the extensions available in the application through dependency injection.
Adding the OpenAI Component Reference
Add the NuGet component reference Azure.AI.OpenAI to the Extensions Adapter project file. Be sure to check the NuGet portal for the most current version and adjust the version if necessary:
Run the command below on a single line:
|
|
Now that you’ve just added a new component, take the opportunity to build the microservice to make sure
that everything is working properly with this new dependency.
Run the command:
|
|
Implementing OpenAI’s Component Integration
At this point, we will implement the integration with the OpenAI component within the Extensions Adapter. The first step is to modify the interface to include a method called “Conversation” and then implement the code that makes the OpenAI API call and returns the result in a format that can be transported to the context of our application.
Open the IIntelligenceService interface in Visual Studio Code.
code src/Core/Application/Interfaces/Adapters/Extensions/IIntelligenceService.cs
Replace with the code below:
|
|
Open the class IntelligenceService in Visual Studio Code.
code src/Adapters/Extensions/IntelligenceService/IntelligenceService.cs
Replace with the code below:
|
|
Adding Environment Variables for Use in OpenAI
In the previous implementation we used the command Dp.Settings.Default("ai.credential") to get the parameter of an environment variable defined in the local project in the “src/App/appsettings.json” file. Open the “DevPrime_Custom” block following the example below adding the OpenAI service URL, the credential and the deployment model and finally we must inform in the item “ai.platform” the value openai or azure.
Open and edit through Visual Studio Code
code src/App/appsettings.json
|
|
Implemented the extension adapter call
The first point of contact with the new functionality made available by the new OpenAI Extension is the Handler that in this context we will use CreateAIEventHandler which has the role of intercepting a domain event and mediating the integration with the platform’s technological resources. To support Extensions we added inheritance for the EventHandlerWithExtensions class in addition to adding the IExtensions interface.
It is important to note that after the previous implementations we now have the provision within the Devprime architecture for a new method Dp.Extensions.IntelligenceService.Conversation() that executes the external code embedded within the Extensions Adapter.
This new implementation will execute the call to OpenAI and return the result. To move forward, open the file and replace all the code.
Open the Handler from Visual Studio Code.
code src/Core/Application/EventHandlers/AI/CreateAIEventHandler.cs
|
|
Because of this modification in the Handler, remove the test file that is not used in this example
using the command below:
Removing file
rm src/Tests/Core/Application/AI/CreateAIEventHandlerTest.cs
Modifying the ADD method in Aggregate Root
Now we’ll return to the business rule in Aggregate Root to perform a customization to the “ADD” method, replacing it with the code below to allow the execution of the “CreateAI” domain event and get that return. This event will be processed in the “CreateAIEventHandler” Handler responsible for interacting with the Extensions Adapter."
Open the Aggregate Root class in Visual Studio Code
code src/Core/domain/aggregates/AI/AI.cs
|
|
Modifying the Interface and Application Services
Due to the implementation in the Extension Adapter, it is necessary to get the Aggregate Root return in Application Services. The first step is to modify the interface IAIService as shown in the example below.
Open the Interface in the Vsiual Studio Code
code src\Core\Application\Interfaces\Services\IAIService.cs
|
|
After modifying the interface in the previous step, it’s time to reflect that change in Application Services. Locate the Add method below and make the replacement so that the app service returns the result of our Aggregate Root.
Open Application Services in Visual Studio Code.
code src\Core\Application\Services\AI\AIService.cs
|
|
Exploring the microservice integrated with OpenAI
At the end of this implementation, we can already perform the tests by running the microservice customizing with the OpenAI integration.
Start the microservice by running one of the scripts below:
|
|
Go to the microservice swagger portal
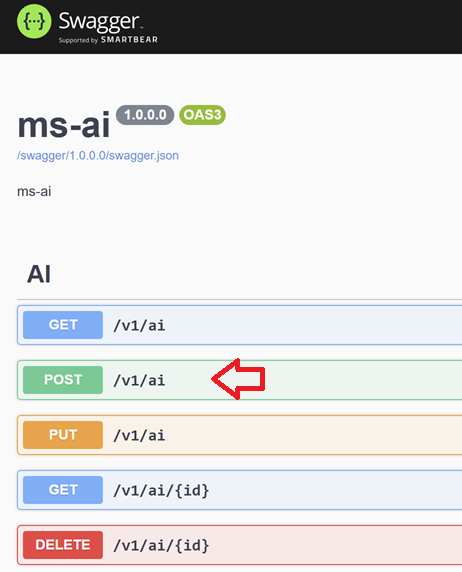
Post to the API from Swagger by filling out the prompt
|
|
And check out the result in the JSON below:
|
|
Follow along with the example log record automatically generated by the Observability Adapter, which details the entire internal flow, from receiving the POST to integrating with OpenAI in the Extensions Adapter.
|
|
More articles about extesions on the Devprime platform
Using SendGrid in microservices
Using Humanizer in microservices