Consuming API using http
This context will be developed using a microservice called “ms-order” and another called “ms-delivery”. The first will expose the API’s and the second microservices will make the requests via HTTP to obtain the details of a request in the “ms-order”.
Prepare the initial environment with docker
This example will use MongoDB as the database and RabbitMQ as the queue in the local docker environment. Make sure you have docker on tour with MongoDB and RabbitMQ containers active. /../../../quick-start/docker/). Enter the RabbitMQ thread to learn how to create the “Devprime” exchange and the orderevents and deliveryevents queues.
Creating “ms-order” microservices
In this microservice we will use an example of a marketplace business ‘order’. Below run the Devprime CLI.
dp new ms-order --state mongodb --stream rabbitmq --marketplace order --init
When finished, the first microservice will be ready for production and with the API’s built by the Devprime CLI accelerator. Run “ms-order” microservices
.\run.ps1 ou ./run.sh (Linux, macOS)
Open the “ms-order” browser microservice at the “https://localhost:5001 or http://localhost:5000” url and make a post to the API to create an order.
Creating “ms-delivery” microservices
Now we will create the ms-delivery and add an aggregate root called “Delivery”.
dp new ms-delivery --state mongodb --stream rabbitmq
Enter the ms-delivery folder and add an Aggregate Root
dp add aggregate Delivery
After executing the commands, open the “Delivery.cs” file in the ms-delivery/src/Core/Domain/Aggregates/Delivery folder and add the code below to the “Delivery” root aggregate to complement the functionality required by our implementation.
code src/Core/Domain/Aggregates/Delivery/Delivery.cs
|
|
After adding the code, run the Devprime CLI to build the basic implementations of the “ms-delivery” microservice
dp init
By the end you will have the “ms-delivery” microservice ready for us to use. To meet our scenario we will make some customizations. At first it is important to remember to change the ports on the Web Adapter in the configuration file ms-delivery/src/App/appsettings.json to 5002 and 5003 to avoid conflict with the “ms-order” when on tour.
code src/App/appsettings.json
|
|
After you change you can run the project and confirm the portal change from the Devprime log. It is important to enforce the presence of the automatic logging provided by the Observability adapter. Finalize the project and follow the next steps.
Creating a DomainEvent and DTO
We will now create a domain event ‘DeliveryGetOrder’ and a Handler to implement the external access call using http. The Devprime CLI offers an accelerator for adding domain events.
We will need a Data Transfer Object (DTO) to convert the result from the “ms-order” API. The first step will be to create the src/Core/Application/EventHandlers/Delivery/Model folder if it doesn’t exist and add a new “OrderCreated.cs” file with the text below.
Open the file via Visual Studio Code (vscode).
code src/Core/Application/EventHandlers/Delivery/Model/OrderCreated.cs
Add the code and save.
|
|
Now that you have a Data Transfer Object (DTO) we’re going to add a domain event. And to make the process easier, we’ll use an accelerator from the Devprime CLI.
dp add domainevent DeliveryGetOrder -agg Delivery
After confirming, open the “DeliveryGetOrderEventHandler.cs” file in the /src/Core/Application/EventHandlers/Delivery folder and implement the query to the external service using Adapter Services by the command “Dp.Services.HTTP.DpGet”.
Open the file via Visual Studio Code (vscode).
code src/Core/Application/EventHandlers/Delivery/DeliveryGetOrderEventHandler.cs
Change the code to evaluate the “result” return. In case of success with the code “200” we will refund the order amount.
|
|
In this example, the Services Adapter will access a Devprime-based API via HTTP and using the “DpGet” command specific to Devprime-based APIs. By using DpGet, it already identifies the result and converts it into the “OrderCreated” format, automatically simplifying the process.
Adding a DomainEvent in Aggretate
The last step is to modify the “Add()” method present in the Aggretate root “Delivery”. Add the implementation to emit the “DeliveryGetOrder()” event that will be intercepted by the previously implemented “DeliveryGetOrderEventHandler” Handler.
code src/Core/Domain/Aggregates/Delivery/Delivery.cs
|
|
If we manage to get the order value, we will update the aggregate and emit the “DeliveryCreated” event, propagating the business fact. If not, we will issue a PublicException
that will return to the caller of that API a failure information in the process.
Demonstrating the Delivery scenario
To start demonstrating the scenario, you need to run the “ms-order” and “ms-delivery” microservices at the same time. As they are at different doors, we will be able to demonstrate the scenario with tranquility.
microservices: Order
- Open the browser in the microservices API “ms-order” at [http://localhost:5000 or https://localhost:5001]
- Make a post to the API ‘/v1/order" by filling in the customerName and total.
|
|
- Do a get in the ‘/v1/order’ API and locate the order code ‘id’
microservices: Delivery
- Open the browser in the “ms-order” microservices API at [http://localhost:5002 or https://localhost:5003]
- Make a post to the ‘/v1/delivery’ API by entering the order code in ‘orderID’.
|
|
- The “ms-delivery” microservices will query the order API using Adapter Services and return the total value of the order. The next step is to create a record in the delivery microservice and emit an event in the Stream
|
|
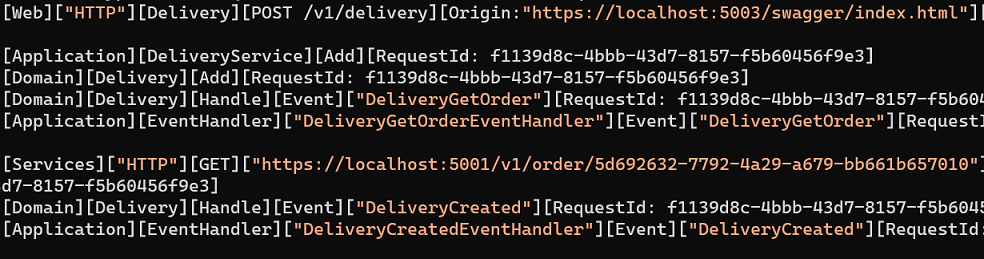
You can also track the ‘GET’ request on the Order microservice side

- In this new scenario generate a GUID with non-existent orderID and post to the ‘/v1/delivery’ API.
|
|
- When querying the “Order” microservice about a non-existent order, the Delivery API returns an error.
|
|
Last modified August 20, 2024 (2f9802da)Congratulations 🚀🚀🚀.