Humanizer
Important
The following example uses the Humanizer library, but you can use the library you want, the focus at this point is on understanding how Devprime enables the use of extensions and how to integrate them into your project without hurting the established architectural principles, ensuring separation of responsibilities and decoupling.
Creating a microservice to use in the example
We will use a microservice based on the Devprime platform
- Use an active account on Devprime and activate the Devprime CLI.
- Start the containers from docker (MongoDB and RabbitMQ)
- Create the customerevents queue in RabbitMQ.
Type the command below in a directory of your choice, and then open the project in Visual Studio, VSCODE, or your preferred IDE:
dp new customer --stream rabbitmq --state mongodb
Go to the root folder of the project: .\customer\
Domain Implementations
We need to include a aggregate root to compose the business functionalities of our context, so type the following command in your terminal:
dp add aggregate Customer
The CLI should create the class Customer.cs where we will include our first business rules. Open the path: code .\src\core\domain\aggregates\customer\Customer.cs and include the properties as shown in the example below:
|
|
Accelerating Deployments with the CLI
The next step will be to use the CLI to speed up most of the necessary implementations and for that type the command below in your terminal:
dp initThe CLI requests authorization to change the necessary files of the solution, in this case we will type A to authorize all the files.
Re-access aggregate root in the path: code .\src\core\domain\aggregates\customer\Customer.cs and change the Add() method as in the following example:
|
|
Still in aggregate root, change the ValidFields() method, removing the validation for the field OrdinalCreationDate, as shown in the following example:
|
|
Adding an extension
We’re now going to include the class HumanService that will be our extension, via the following Devprime CLI command.
dp add extensions HumanServiceThe CLI requests authorization to change the required files of the solution, press A to authorize all the files.
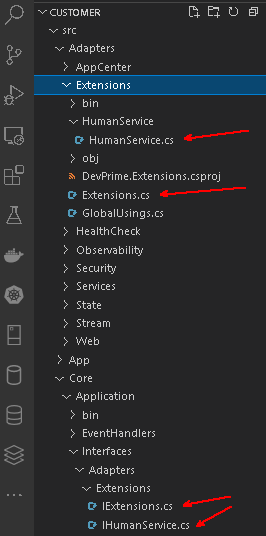
The following image shows the class HumanService and its Interface IHumanService, whose responsibility will be to implement the integrations with the Humanizer library.
It also shows the class Extensions and the interface IExtensions whose purpose is to be a proxy that allows the Devprime Pipeline execution context to access all extensions available in the application via dependency injection.
 `
`
Adicionando a referência para a biblioteca Humanizer
Nós vamos incluir a biblioteca Humanizer em nosso projeto, lembre-se de definir o destino de instalação para o projeto “Devprime.Extensions”. code .\src\adapters\extensions\Devprime.Extensions.csproj
Via dotnet CLI
dotnet add .\src\adapters\extensions\Devprime.Extensions.csproj package HumanizerRode também o dotnet build no projeto. (Lembre-se de estar na pasta raíz do projeto .\customer\):
dotnet buildImplementando a integração com a biblioteca Humanizer
Nós vamos alterar a interface “IHumanService” existente no caminho code .\src\core\application\interfaces\adapters\extensions\IHumanService.cs, incluindo a assinatura de método a seguir:
|
|
Nós também precisamos implementar o método na classe “HumanService” code .\src\adapters\extensions\humanservice\HumanService.cs, deixando-a conforme segue:
|
|
Implementado a chamada ao adapter de extension
O nosso cenário envolve um evento de domínio chamado “CustomerCreated” e associado a ele temos um EventHandler chamado “CustomerCreatedEventHandler”, que possui uma chamada ao Devprime State Adapter para persistência dos dados (linha 11) e emite um evento externo à aplicação (linha 26).
Caminho: code .\src\Core\Application\EventHandlers\Customer\CustomerCreatedEventHandler.cs
|
|
Altere o código do nosso EventHandler conforme modelo abaixo (vide linhas destacadas):
|
|
Testando a aplicação
Agora que temos as implementações necessárias, vamos rodar o microsserviço através do comando abaixo:
Windows
.\run.ps1Linux / Mac
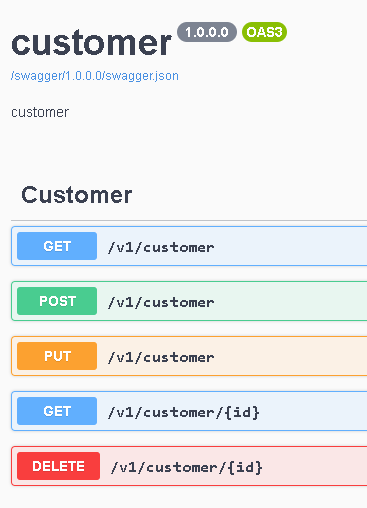
.\run.shNo browser, acesse o link: https://localhost:5001/swagger, nós vamos utilizar o método POST para criar um novo customer:
 `
`
Use the Request Body below:
|
|
Still in the API use the GET endpoint to get the registered customers (you don’t need to pass any parameters), the result of Response Body should be similar to the following:
|
|