Aplicando segurança nas API's
Durante esse cenário nós utilizaremos o adapter de security do Devprime stack para ativar as configurações de segurança e nós recomendamos que tenha implementado o item Aplicando segurança na Web.
Para avançar nesse cenário é fundamental ter uma instância do Keycloak e seguir os passos conforme instruções abaixo:
- Crie uma instância do Keycloak seguindo os procimentos indicados.
- Instale o Devprime CLI.
- Criando um microservico para uso na demonstração “ms-sec-order”
dp new ms-order-payment --state mongodb --stream rabbitmq --marketplace payment --init
dp new ms-order-delivery –state mongodb –stream rabbitmq –marketplace delivery –init
-
Após a conclusão é possivel executar o microsserviço. Depois finalize.
.\run.ps1 ou ./run.sh (Linux, macOS) -
Alterando a porta padrão do microsserviço
Nós vamos agora editar o arquivo appsettings.json disponível na pasta ms-payment/src/App para configurar o adapter web e depois o adapter security. Aletre o valor do parâmetro url para evitar conflito de portas.
|
|
- Abra o arquivo de configurações e inclua no adapter de security os parametros do Keycloak obitidos no item 1 desse passo a passo alterando os itens “Domain, ClientID / ClientSecret / LogoutUri / Audience”
code ./src/App/appsettings.json
|
|
Após concluindo esse estágio o controle de segurança de acesso a API já configurado. Localize o arquivo Payment.cs na pasta ms-payment/src/Adapters/Web/ para configurar a restrição de acesso à uma rota na API. No exemplo abaixo aplicaremos no item “app.MapPost /v1/payment”.
    public override void Endpoints(WebApplication app)
    {
        //Automatically returns 404 when no result
        app.MapGet("/v1/payment" ,[Authorize] async (HttpContext http, IPaymentService Service, int? limit, int? offset, string ordering, string ascdesc, string filter) => await Dp(http).Pipeline(() => Service.GetAll(new Application.Services.Payment.Model.Payment(limit, offset, ordering, ascdesc, filter)), 404));
        //Automatically returns 404 when no result
        app.MapGet("/v1/payment/{id}", async (HttpContext http, IPaymentService Service, Guid id) => await Dp(http).Pipeline(() => Service.Get(new Application.Services.Payment.Model.Payment(id)), 404));
        app.MapPost("/v1/payment", async (HttpContext http, IPaymentService Service, Devprime.Web.Models.Payment.Payment command) => await Dp(http).Pipeline(() => Service.Add(command.ToApplication())));
        app.MapPut("/v1/payment", async (HttpContext http, IPaymentService Service, Application.Services.Payment.Model.Payment command) => await Dp(http).Pipeline(() => Service.Update(command)));
        app.MapDelete("/v1/payment/{id}", async (HttpContext http, IPaymentService Service, Guid id) => await Dp(http).Pipeline(() => Service.Delete(new Application.Services.Payment.Model.Payment(id))));
    }
-
Execute novamente o microsserviço e abra a url https://localhost:5003
-
Entre no swagger e tente efetuar um “GET”
-
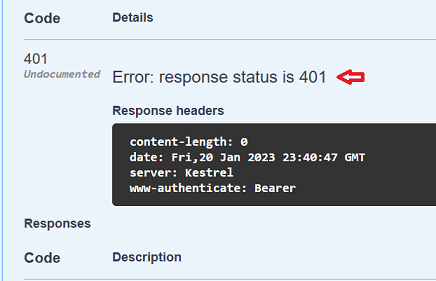
Como a segurança está ativa a resposta será um 401 indicando falta de permissão

-
Você também pode realizar o mesmo teste utilizando o curl
curl https://localhost:5003/v1/payment -i
HTTP/1.1 401 Unauthorized
Content-Length: 0
Date: Fri, 20 Jan 2023 23:49:26 GMT
Server: Kestrel
WWW-Authenticate: Bearer
Próximos passos:
Você protegeu o acesso a uma API do microsserviço utilizando o Keycloak.
Parabéns🚀